Free images tag: Amazon
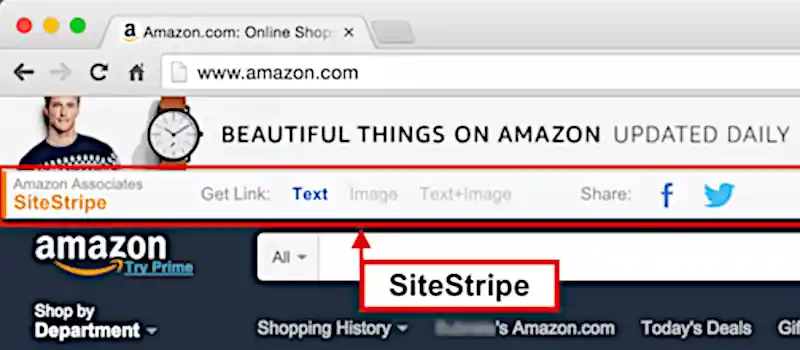
How to Enable the Amazon Associate Site Stripe
The Amazon Affiliate Program, also known as Amazon Associates, is a powerful way to earn income by promoting and linking to Amazon products. Amazon Associates provides its members with a dedicated site full of tools to help affiliates generate and monitor their affiliate marketing efforts. One of these essential tools is the Site Stripe, a browser toolbar that simplifies the process of creating affiliate links directly from Amazon's product pages.
What Is the Amazon Associate Site Stripe?
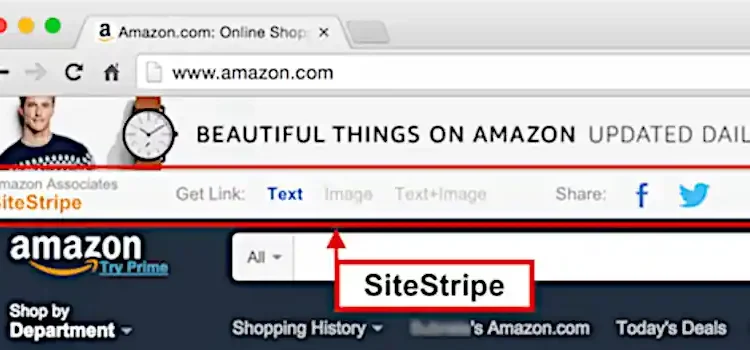
The Site Stripe is a browser toolbar that appears at the top of Amazon’s website when you're logged in as an affiliate. It allows you to quickly create affiliate links for products, share links directly to social media, and access other useful tools without needing to navigate away from the product page. This makes it a valuable time-saver for affiliates who need to generate deep links effortlessly.
Why Can't I See the Site Stripe?
Sometimes, the Site Stripe may not appear in your browser, either because it's disabled or hidden. Fortunately, enabling it is quick and straightforward. Below are the steps to ensure the Site Stripe is active on your account.
Steps to Enable the Amazon Site Stripe
For UK Associates:
- Visit the UK Amazon Associates SiteStripe settings page: https://affiliate-program.amazon.co.uk/home/account/sitestripe.
- Log in to your Amazon Associates account if prompted.
- Locate the "Display Status" toggle and switch it to "Enabled".
For US Associates:
- Visit the US Amazon Associates SiteStripe settings page: https://affiliate-program.amazon.com/home/account/sitestripe.
- Log in to your Amazon Associates account if necessary.
- Toggle the "Display Status" setting to "Enabled".
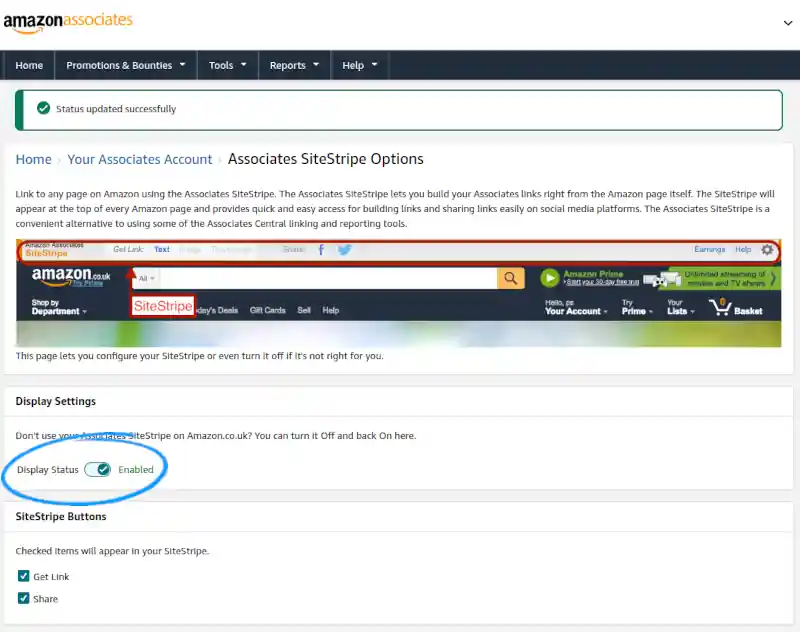
Alternative Method:
- Log in to your Amazon Associates dashboard.
- Navigate to Account Settings.
- Select Associates SiteStripe Options.
- Toggle the "Display Status" to "Enabled".
Confirming the Site Stripe Is Enabled
Once you’ve enabled the Site Stripe, visit Amazon's website in the same browser, while still signed into your Amazon Associates account. You should see the toolbar at the top of the screen. If it’s visible, you’re ready to start generating affiliate links directly from product pages (deep linking).
Benefits of the Amazon Site Stripe
- Quick Link Generation: Create affiliate links without navigating to another page.
- Social Media Sharing: Share affiliate links directly to platforms like Facebook or Twitter.
- Convenience: Access essential affiliate tools directly from the browser.
The Site Stripe is a must-have feature for anyone serious about affiliate marketing with Amazon. By enabling it, you streamline your workflow and maximize your efficiency as an Amazon Associate.
Start using the Site Stripe today and take your affiliate marketing efforts to the next level!
How to Enable Developer Mode on Fire TV: Unlocking Developer Options for Sideloading Apps
Fire TV, much like Android devices, has a hidden Developer Mode that allows you to unlock advanced options including settings, and install apps from unknown sources, also known as sideloading. Fire TV's operating system, Fire OS, is based on Android, so the process of enabling developer mode is quite similar to what you would do on an Android smartphone or tablet.
In this guide, we'll walk you through how to enable Developer Options on your Fire TV and explain how you can use these settings to install apps from outside the official Amazon App Store.
Step-by-Step Guide to Enabling Developer Mode on Fire TV
1. Access Fire TV Settings
From your Fire TV’s Home screen, navigate to the settings by selecting the gear wheel icon in the top-right corner of the screen. This will take you to the main Settings menu, where you can manage everything from device preferences to app permissions.
2. Find "My Fire TV"
Once in the Settings menu, scroll down and select My Fire TV. This section contains all the important system settings, including those related to developer options.
3. Unlock Fire TV Developer Options
Now, this is where things get interesting! Similar to enabling developer mode on Android devices, you need to "unlock" this hidden menu:
- Select About within the My Fire TV menu.
- Inside the About section, scroll down and find Fire TV (or Device Name).
- Tap the Fire TV (or Device Name) button ten times. As you tap, you’ll notice a countdown at the bottom of the screen.
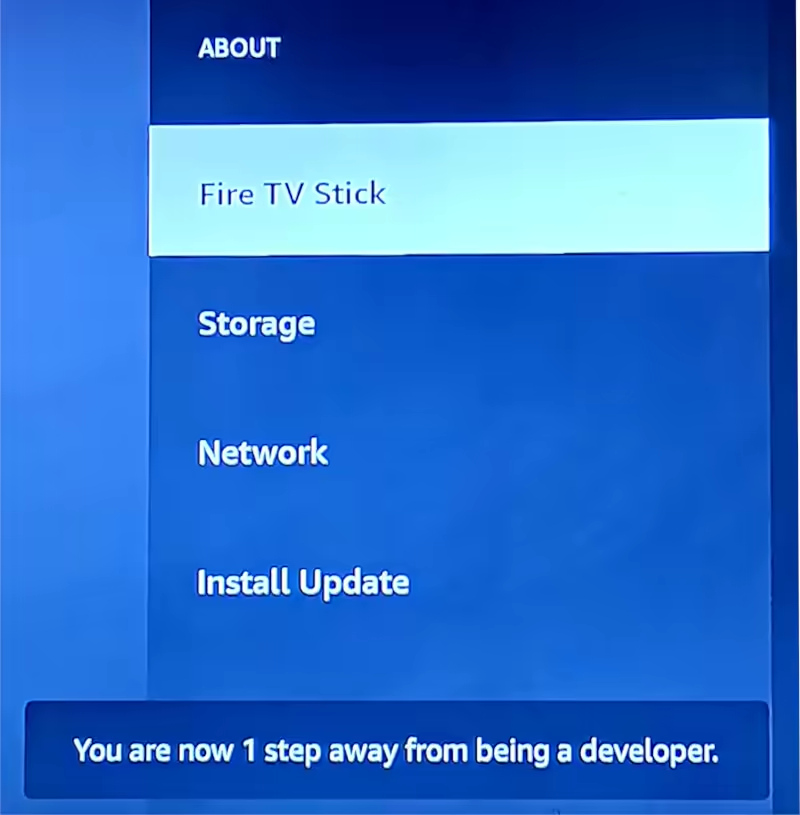
When the countdown reaches zero, a message will pop up saying “No need, you are already a developer.” Congratulations! You've just unlocked the developer mode on your Fire TV.
4. Access Fire TV Developer Options
After enabling developer mode, it may seem like nothing has changed at first glance. To access the new menu, press the Back button on your remote to go back to the previous My Fire TV menu.
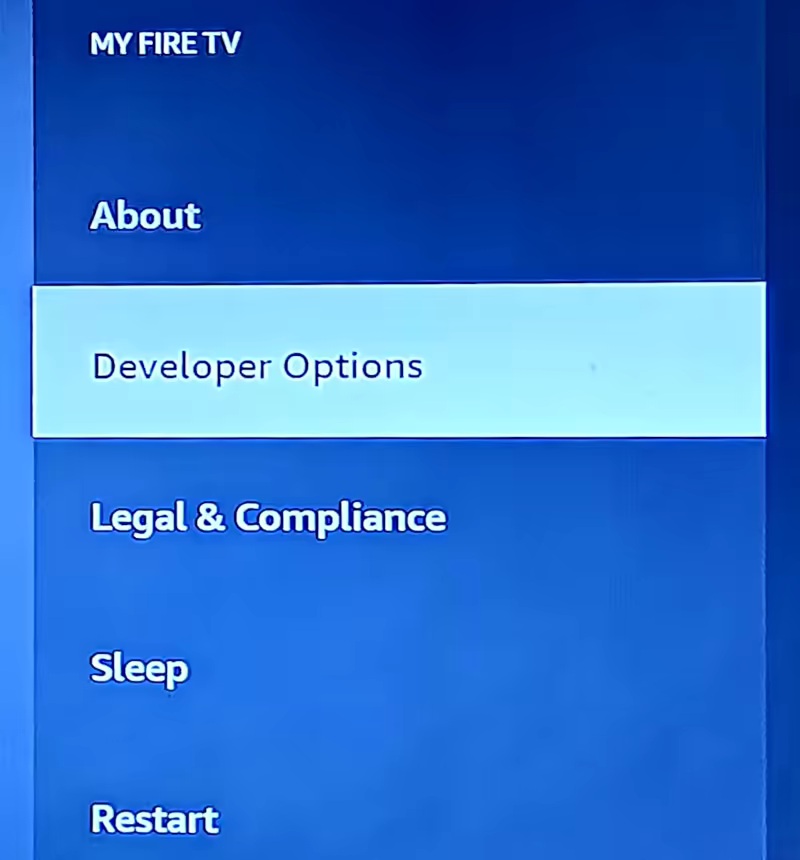
Now, you'll notice a new option called Developer Options listed below About. Select this to enter the newly unlocked menu.
5. Explore Developer Options
Inside Developer Options, you will find several advanced settings that are crucial for developers and tech enthusiasts:
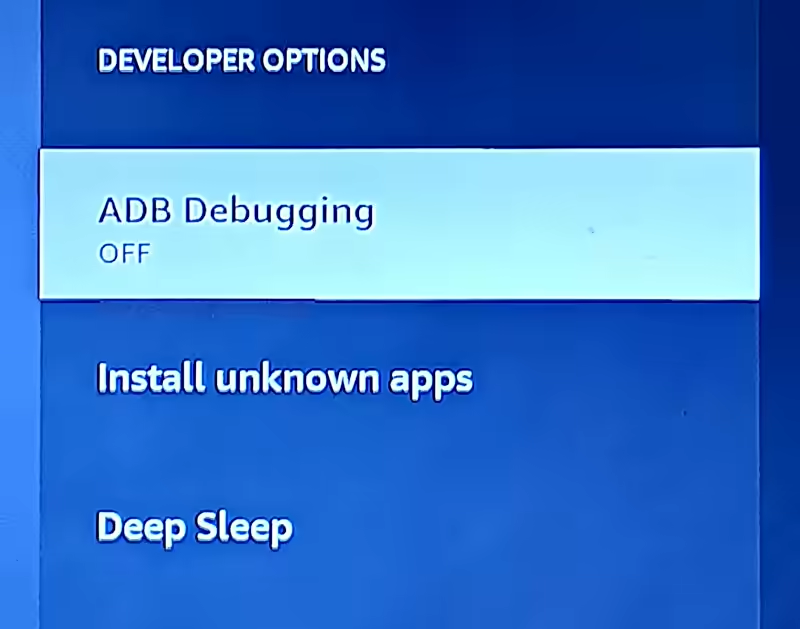
- ADB Debugging: This allows you to connect your Fire TV to a computer for debugging and development purposes via Android Debug Bridge (ADB). This is especially useful if you're developing apps or want to push apps to the Fire TV directly from a laptop or phone.
- Install Unknown Apps: This is the option you’ll use to allow the installation of apps from sources other than the Amazon App Store. When you enable this, you can sideload apps by installing APK files from external sources like websites or app repositories.
- Deep Sleep: This option manages the deep sleep function, useful for optimizing device performance or controlling how your Fire TV handles power management when it's not in use.
6. Enable "Install Unknown Apps" for Sideloading
To sideload apps, navigate to the Install Unknown Apps option within Developer Options. Once inside, you’ll see a list of installed apps. For each app, you can toggle the permission to install APK files from unknown sources. For example, if you have a third-party app downloader like Downloader, you can enable it here to start installing apps from outside the Appstore.
How Developer Mode in Fire OS Mirrors Android
Since Fire OS is built on Android, the process of enabling developer mode and accessing developer options is nearly identical to doing so on any Android phone or tablet. On Android, you would also tap on the Build Number in the About section multiple times to unlock developer options. Both platforms hide these settings by default to protect everyday users from making unintended changes to their system, but the process to unlock them is simple for anyone who needs advanced features.
Why Enable Fire TV Developer Mode?
Enabling Developer Mode and accessing the Developer Options opens up a whole world of possibilities:
- App Testing: If you're a developer, you can use ADB Debugging to test and debug your apps directly on the Fire TV.
- Sideloading: Installing apps not available in the Amazon App Store, such as third-party streaming services, game emulators, or custom launchers, becomes easy with sideloading. This is especially helpful for those looking to expand the functionality of their Fire TV.
- Customization: You can also use third-party apps to customize the appearance and behavior of your Fire TV, much like rooting or modding an Android device.
Final Thoughts
Unlocking Fire TV Developer Mode on your device is essential if you want to sideload apps or explore deeper customization options. With just a few taps and the hidden Developer Options revealed, you can install apps from unknown sources, connect your Fire TV to a computer for development purposes, and more. Whether you're a developer or a tech enthusiast, enabling these advanced settings can greatly enhance your Fire TV experience.
Enjoy the freedom and power of being a "developer" on your Fire TV!
humax-foxsat-not-booting.webs.com
Technology June 3, 2024 0
With the demise of the webs.com hosting all the nice and all the poor webs.com sites have been removed from the webs server that now redirects to an unhelpful Vistaprint site. One of our customers has asked we resurrect their site here for them. We were happy to oblige and here is the new home for humax-foxsat-not-booting.webs.com

Your Humax Foxsat HD Freesat not booting or taking ages to start?
Includes 3rd Capacitor fix which fails on older or longer used boxes (updated)
You can find a solution below:
Rotating green lines on the display don't disappear
I was stuck with the rotating green lights on the display of my Humax Foxsat HD set-top box one evening. No sign of 'APPL' then the channel number on the green display. Powering down the STB (Set Top Box) and powering it back up again after a wait of 30 seconds or so (Power cycling) occasionally brought the box back to life, but it was getting worse. Eventually, the display would just get stuck on the green rotating lights, even after 30 minutes. Power cycling wouldn't fix it any more.

Firmware Update
My first step was to update the firmware and bootloader via the USB port on the back of the Humax Box. The firmware is available on the Humax website
A simple process (the USB port is on the rear of the Foxsat HD, under the ethernet port), put the firmware on a USB stick (one of these), rename it, attach the stick to the Humax Foxsat and press and hold the power button.
The upgrade went in ok, but didn't fix the very slow starting of the Humax.
Faulty Capacitors
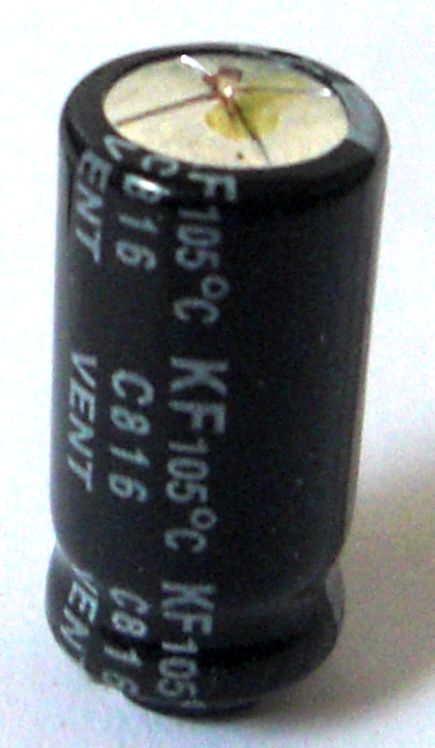
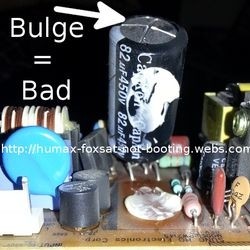
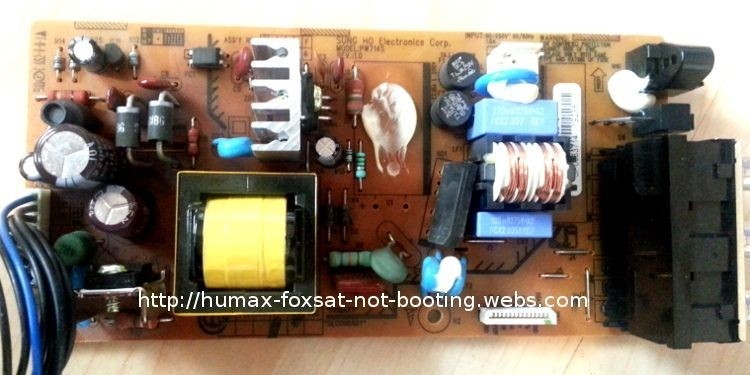
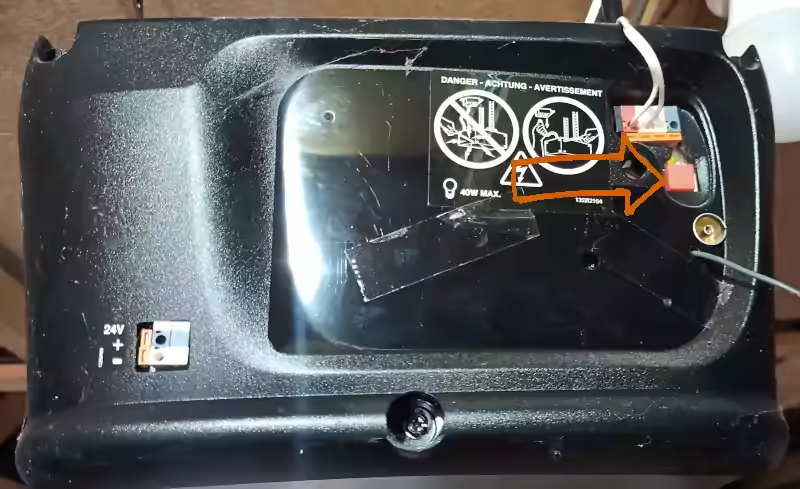
Faulty capacitors were once the killer of olden-day STBs (Set Top Boxes), but surely things have progressed since the first satellite television service was launched? There is only one way to find out and that is to open up the box and take a look. Faulty capacitors can have a tell-tale bulge on the top or some goo on the top that has leaked out or a bit of both (bulge and goo).
The cover is held on by several screws, easy to remove the top cover to reveal the mainboard and power supply board.
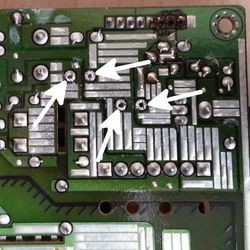
The picture is of the power supply board in the Humax Foxsat HD STB, One of the pair of capacitors on the left of the image has 'blown'. It's worth changing both capacitors because if one has gone, the other is soon to follow. Change just the pair, unless the others look suspect, then change these too. Don't forget which capacitors went where and their polarity!
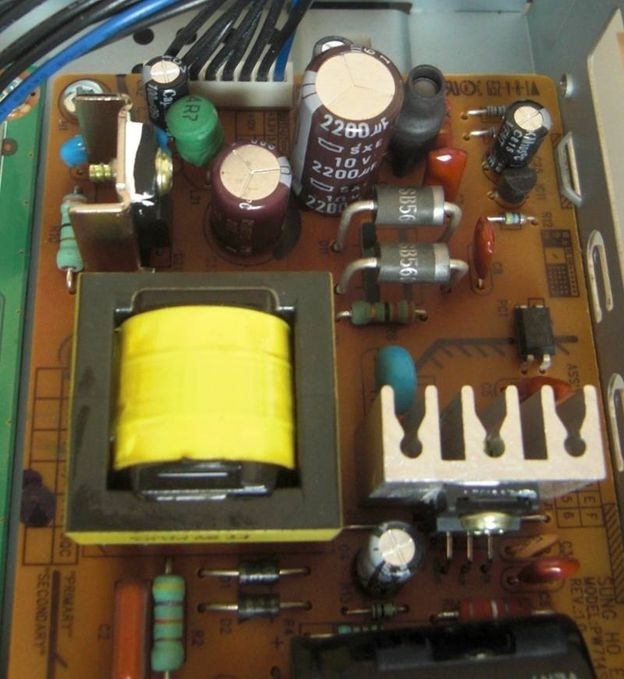
Removing the power supply board is easy, the connectors pull off and two silver screws are holding the board to the case and two silver screws on the rear of the case holding the connectors to the rear panel. With the board out, replace the two capacitors. Observe the polarity and ensure you fit the new capacitors with the negative mark in the same position as the one you have removed. A thick black line on the board indicates negative and the capacitor will have a negative marking on the outside shell to indicate the negative lead.
Update:
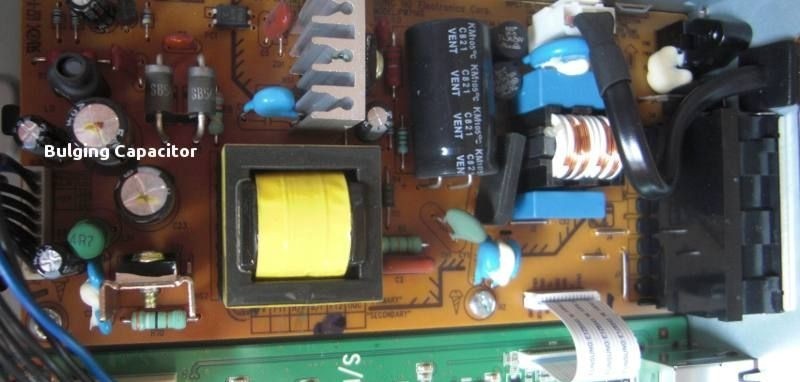
Another capacitor is worth changing if it's 'bulging' or you want to do a fully covered job.
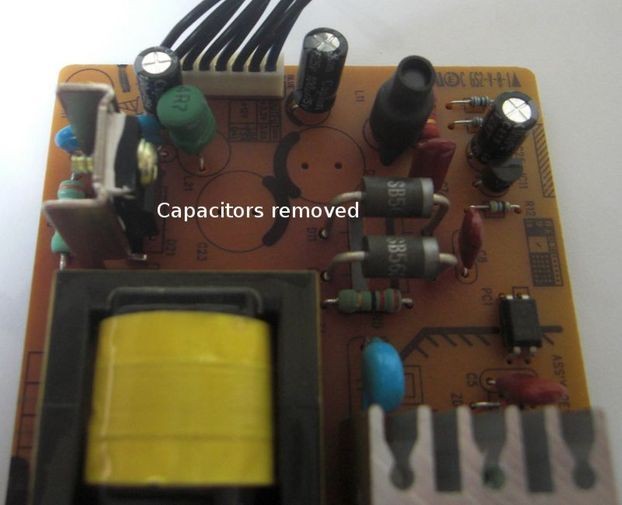
Capacitors removed by de-soldering (above)
New capacitors fitted (below)
Fit the two new capacitors in the place of the old ones, noting the correct polarity, reassemble the power supply to the box, put the screws back, refit the cover and test! Hey Presto, an almost instant boot-up (well it feels instant).
Update:
While you are inspecting the 2 capacitors marked, also cast your eyes over the very large capacitor on its side and look for a bulging or curved top (silver cap) or bottom (black plastic with the legs). This capacitor has been known to fail eventually and after the other two smaller ones have been changed.
The largest capacitor may be glued down to the board and will need a bit of a tug to release the bond, but unsoldering and replacement are the same as the smaller two.
You may not need to change the large capacitor, you may want to change it just in case or you may want to change it if the boot-up failure reappears sometime after fitting the two smaller ones.
Parts Required:
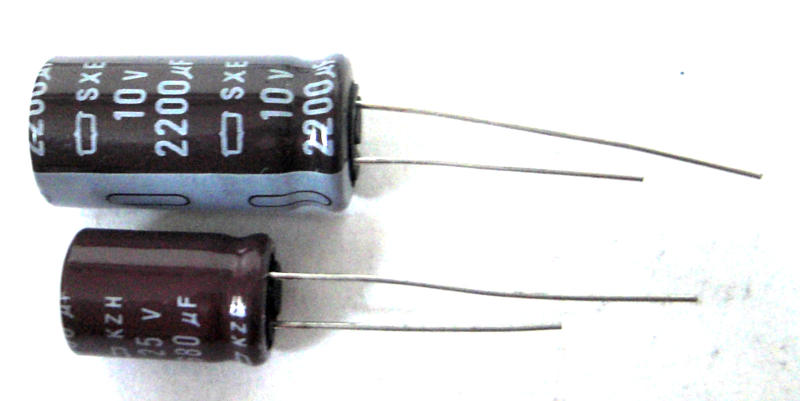
RUBYCON CAPACITOR 2200UF 10V
RUBYCON CAPACITOR 680UF 25V
If the Rubycon Capacitors listed above are low on stock or are becoming difficult to find, they can be substituted with the Panasonic 105°C Capacitors listed below.
2200uf 10v Panasonic
and 680uF 25v Panasonic
Update:
The largest capacitor is marked as 82uF and 450V, you can find the long-life - KXJ version (10,000hour as opposed to 2000hour) replacements
If the 10,000 hour version is unavailable, use the 5000h Rubycon from Amazon
A new 3rd capacitor was fitted to complement the 2 smaller ones that had previously failed on the power supply board to fix the non-boot problem of the Humax FoxSat boxes.
The tools used
If you don't already have the tools, you will need these (and not very expensive)
- Soldering Set (Soldering Iron, De-soldering tool, Solder and Sponge)
or find a Soldering Iron Kit on Amazon. - Philips Number 2 Screwdriver
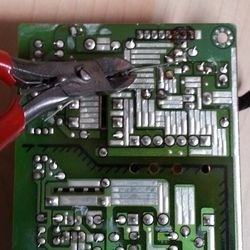
- Electronic flush side cutters to trim the capacitor leads after soldering them into the power supply board, use side-cutters
Some more pictures of the Humax Repair
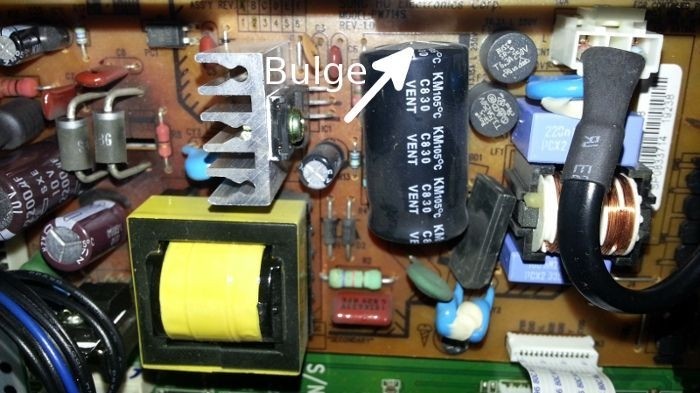
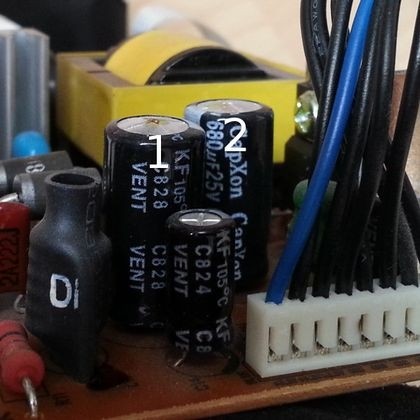
Capacitors marked 1 and 2 are faulty
Bulging capacitors are faulty and need replacing
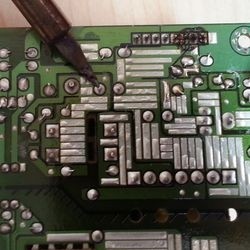
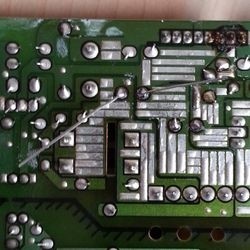
carefully identify the correct leads to desolder
Capacitors unsoldered from the board - view from below
new capacitors soldered in position with leads bent slightly to hold them in place
excess leads trimmed with side cutters after soldering
The 2 capacitors have their solder contacts marked with an arrow
The bulging and failed capacitor problem is not unique to the Humax Foxsat, although it does have its share of these failures. There is an interesting story behind the problems that capacitor manufacturers found themselves in on the Wikipedia page. Well worth a read and you may find many other devices that have prematurely failed due to some very inexpensive and relatively easily replaced common components.
Chamberlain, Liftmaster (Professional), Merlin and many more remote garage door fob reprogramming instructions.
Losing the garage opener remote control is not a huge disaster, as you may have first thought; we were in a similar position with both Chamberlain Liftmaster garage door openers that went missing with other keys.
Source the replacements
Finding the replacements was easier than first thought. The fobs are available (here) to buy and need programming to pair them with the door-opening motor. You can match the fob by the look, as in the 'Bear Paw' Chamberlain Liftmaster Professional in the featured image. But many other original-looking garage door opener remote fobs are available (on Amazon), and even more aftermarket, universal learning fobs.
Instructions
Each replacement has the programming instructions included, but the instructions are unclear. I have attached instructions to help you get the new door opener with your garage or gate opener.
If you have lost, rather than damaged, a remote garage door or gate opener control, you would be advised to delete the pairings of the lost controls. This would render the missing fobs from functioning should they become found and an attempt made to gain entry.
Follow the Deletion steps below before adding new remote opener fobs to your system.
Pairing Steps
- Locate the ORANGE button under the light cover or on the rear of the door lifting motor. The ORANGE button puts the garage door opener into learning mode. The learning mode will allow the electronics inside to accept the new fob as one that can control the opener.
2. Press one of the buttons on your new remote handset. Continue to press this button while you work through steps 3 and 4.
3. Press and release the ORANGE Learn button while holding a button on your remote handset.
4. Release the button on your new remote
5. If successful the light on the unit will turn on.
Your new remote is now programmed.
If the programming has been unsuccessful, repeat the steps from the beginning. After a few failed attempts, check or change the battery in the new key fob. The advantage of the green buttoned version is that a green light indicates the signal is being sent. Hence the battery is good.
Note
Please note on most remote fobs, the Number 3 and Number 4 buttons have the same function. When you program one, the other will have the same function.
Deleting remote fob instructions
Press and hold the 'Learn Delete' button on the garage door opener for 6 seconds until the light flashes. All the remote handsets are now deleted.
Where is the elusive OBD2 port located on the 2011 model Ford C Max?
Hopefully, the picture will help you locate the Second Generation C-MAX OBD port hidden behind a fold-down flap under the lighting control switch.
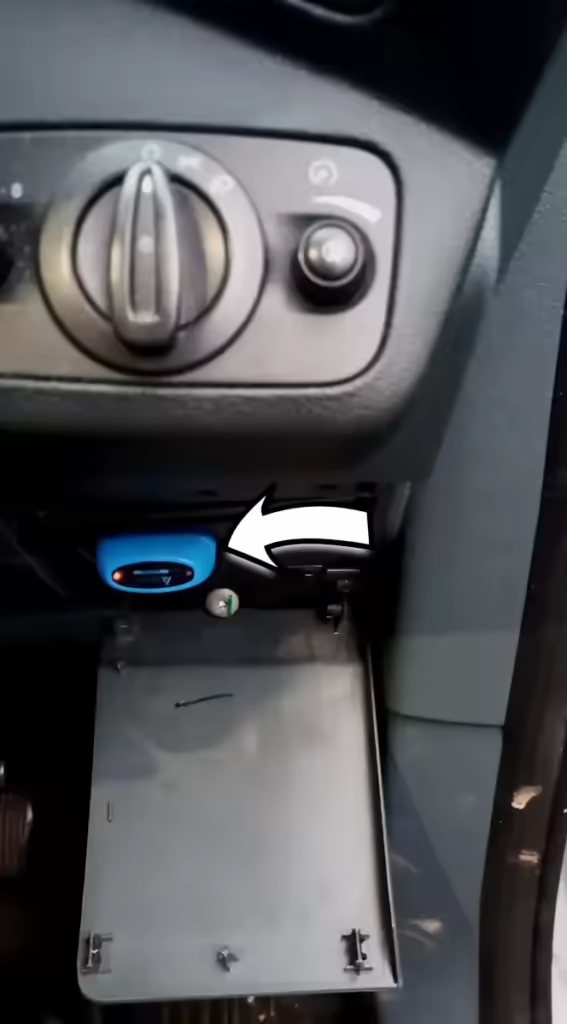
The arrow points to my NEXAS NexLink Bluetooth 5.0 OBDII Scanner (from Amazon) connected to the C-MAX OBD Port that sends data to my phone. This allows the information on the car to be read into the phone for diagnostics; the app for this is FORSCAN. The app is available for iOS, Android and Windows, designed for connecting to Ford vehicles, including the C-MAX.
OBD Port location
The OBD port is hidden behind a hinged plastic panel. The easiest way to open that plastic flap is to open the driver's door to access the edge of the top of the cover and pull it towards you. This pull will release the plastic clips and allow the cover to hinge down. With the flap down, the OBD adaptor plugs into the socket, but you may have to rotate it as the plug will only match the socket in one orientation.
Disconnecting
You need to give the adaptor a good tug to detach the OBD reader from the C MAX OBD port. Pulling the plug from the socket takes more force than you may expect. With the OBD adaptor released from the OBD port, the flap and be hinged back into the vertical position, and a firm push will re-engage the clips that hold it in place.
Close the OBD flap
Closing the cover with a device attached to the OBD port is impossible. You can remove the flap to drive the car with the OBD device attached, for example, while conducting live data tests or for black box insurance. You can unclip the flap at the bottom right hinge, and the bottom left will be free when you move the flap to the right.
You may be in the incorrect Amazon password loop that makes no sense until you know the trick.
Set a secure password.
You click the forgot password button to trigger the authentication to your email or phone, that all goes well, and then you set a nice memorable password. You do the same for the other Amazon account; for example, you have amazon.com and amazon.co.uk, or you are an Amazon affiliate and need to update your affiliate password simultaneously.
Problems
This is when you get into the incorrect password loop because although the password initially works and allows you to log in, the password fails on subsequent attempts to log into Amazon.
It is impossible to have a password for each of the domains associated with your Amazon accounts. Good practice would suggest different passwords for each domain to provide a separation should a password be breached/guessed/phished.
Same Password
I can only get all my different Amazon domain logins to work with a single password. Whichever I update last becomes the master password for all the Amazon domains I try to log into. I got into a loop of setting a password, testing it, and then setting another one on a different Amazon site that overrides the previous one—effectively forcing me to use the same password over multiple Amazon domains.
Wasted Time
That little gem wasted 20 minutes checking, saving, and testing passwords several times over several Amazon domains. I suppose it is for convenience, but it needs to be backed up with a 2FA - The second factor of authentication like an SMS message, app notification, or old-fashioned email.
Upgrading the old ITV Hub to ITVX is not possible. There is no ITVX app available in the Samsung store, and ITV Hub has disappeared, and there is no ITVX.
These problems recently occurred for a few people looking to use the new ITV streaming option. Billed as the freshest television programming, ITVX allows you to watch ITV programs as catch-up TV by streaming the channels over the internet.
ITVX
ITVX is the new name for the ITV Hub, but it's more than just a name change. A lot of money has been spent on the new launch of ITVX, and everyone has been urged to upgrade from ITV Hub to the new ITVX. But not everyone can get ITVX on their television, even if ITV Hub was previously used to stream television.
Samsung TV
A common problem is with some slightly older, flat-screen Samsung TVs. They work with ITV Hub but not with ITVX. Samsung support is very good at updating their hardware, and the televisions are no different. Unfortunately, no Samsung TV update can fix ITVX if your television is currently up to date,
Automatic Updates
Samsung TVs will automatically update, but so will many other brands of the top tier manufacturers. If the automatic update isn't working, you can perform a full factory reset and start the auto-update process. Unfortunately, you may find that ITVX is still unavailable, and the ITV Hub icon has disappeared.
Apps
Some television cannot run the ITVX app, which is why it is not available in the app store. The new ITVX app has been redesigned to take advantage of the hardware in the newer televisions. Unfortunately, this means that although you may be able to run the old ITV Hib, your television can not run ITVX. This leads you to find that ITVX is not available.
The ITVX fix
If your television software is up to date and ITVX is unavailable (even if ITV Hub was), then you may not be able to use ITVX on your television as it is. There is no magic file to download, no USB stick fix, and no files sent by email; it's all hardware. You need to replace the television.
Other options are to use an Amazon Firestick or a NowTV box capable of running ITVX and connect your TV to the external stick/box. While not ideal, it works because the ITVX app is not running on the television but on an external device.