Free images tag: Ubuntu
Resolving Double Icons on Ubuntu Desktop Caused by Dual Desktop Icons NG Instances
Introduction
Have you recently noticed double icons on your Ubuntu desktop, where one set of icons is interactive while the other appears "stuck" to the wallpaper? You’re not alone. This bug, related to the popular Desktop Icons NG (DING) extension, has caused many users to experience duplicate desktop icons. The issue is due to two instances of DING running simultaneously, leading to overlapping icon sets on your desktop. Thankfully, the solution is straightforward and can be easily resolved with a few adjustments.
Why Double Icons Appear
The GNOME extension Desktop Icons NG (DING) is responsible for managing desktop icons in Ubuntu. It adds icons to the desktop environment, giving users the flexibility to interact with files and shortcuts directly from their desktop screen. When two instances of DING are active simultaneously, the system attempts to display the icons twice. As a result, one set behaves normally (clickable, movable), while the other set looks like part of the wallpaper and is unresponsive.
Quick Fix: Disabling One DING Instance
To fix this, you’ll need to disable one of the running DING instances in GNOME Extensions. Here’s how:
- Open the Extensions App:
- Go to Applications > Accessories > Extensions. This will open the GNOME Extensions app, which lets you manage various desktop extensions.
- Locate the DING Extension:
- Scroll down to find Desktop Icons NG (DING). You may notice two instances of this extension listed.
- Disable the Duplicate Instance:
- Turn off one of the two DING instances. Ensure that only one instance is running.
- Verify Your Desktop:
- After disabling the duplicate instance, check your desktop to confirm that the icons have returned to normal, with only one set of interactive icons displayed.
Avoiding Future Issues
This bug usually appears after a system update or extension upgrade. To prevent future issues:
- Regularly review your Extensions app to ensure that only one instance of each extension is active.
- If the issue reoccurs, simply follow the steps above to disable any duplicate instances.
Conclusion
Double icons on Ubuntu desktop can be visually jarring, but the solution is quick and easy. By disabling the extra DING instance, you’ll restore your desktop to a single set of interactive icons. If you encounter other desktop issues, the GNOME Extensions app is a great place to start troubleshooting.
Why Ubuntu Keeps Crashing Back to the Login Screen: Understanding the OOM-Killer and How to Disable It
If you're using Ubuntu and have experienced the frustration of your system crashing back to the login screen—only to find that all your open apps have disappeared—you’re not alone. This issue, often referred to as a "desktop crash," can be incredibly disruptive. You might think your system is overloaded or something is wrong with the hardware, but even machines with 8GB or 16GB of RAM running modern versions of Ubuntu can suffer from this problem.
In many cases, the culprit is Ubuntu's OOM-Killer (Out Of Memory Killer), a system process that terminates applications when the operating system detects low memory. While this is intended to protect your system, it can sometimes lead to over-aggressive app termination, even when it seems like there’s plenty of RAM available. Fortunately, there’s a workaround for this issue—masking the OOM-Killer can effectively stop these crashes.
In this blog, we’ll explore why this happens and walk you through a simple solution: disabling the OOM-Killer. Don't worry; this is a beginner-friendly guide with step-by-step instructions.
Why Does Ubuntu Crash Back to the Login Screen?
Ubuntu is designed to manage system resources like memory (RAM) efficiently. When your system runs low on memory, the OOM-Killer steps in and forcibly closes applications to free up RAM. This is typically a good thing, as it prevents the system from freezing or becoming unresponsive. However, in some cases, the OOM-Killer is too eager to terminate processes, and it ends up closing the desktop environment itself, which brings you back to the login screen and kills all your open apps in the process.
Here are some reasons this might happen:
- Resource-Intensive Applications: Running many applications simultaneously (or memory-hungry ones like video editors) can trigger the OOM-Killer, even if you have a decent amount of RAM.
- Background Processes: Sometimes, background services consume more memory than expected.
- Kernel Mismanagement: The kernel might incorrectly calculate the system's memory usage, causing the OOM-Killer to be triggered unnecessarily.
Even with 8GB or 16GB of RAM, users have reported frequent desktop crashes where they are suddenly logged out, losing all unsaved work. The problem seems especially prevalent in recent Ubuntu releases.
The Solution: Masking the OOM-Killer
A proven solution to stop these crashes is to mask (disable) the OOM-Killer from running. Masking a process in Linux effectively disables it, and in this case, it stops the OOM-Killer from terminating your desktop environment.
After masking the OOM-Killer, users have reported that their Ubuntu machines continue to run for days without issues—no crashes, no sudden logouts, and no loss of apps.
However, note that disabling the OOM-Killer comes with a warning: in some cases, Ubuntu may attempt to kill the desktop environment, but instead of crashing, the system will continue to work and display an error report.
How to Disable the OOM-Killer: A Step-by-Step Guide
If you want to give this solution a try, follow these simple steps. Remember, this change is reversible, so if it doesn’t work for your system, you can always undo it.
Step 1: Open the Terminal
First, open your terminal by pressing Ctrl + Alt + T, or you can find it by searching "Terminal" in the Ubuntu menu.
Step 2: Mask the OOM-Killer
In the terminal, type the following command and press Enter:
sudo systemctl mask systemd-oomdThis command masks (disables) the OOM-Killer service, preventing it from running.
Step 3: Reboot Your System
After masking the OOM-Killer, you could restart your system but we found it unnecessary. You can reboot your system with this command:
sudo rebootOnce your system restarts, the OOM-Killer will no longer terminate applications, including your desktop environment.
What If This Doesn't Solve the Problem?
If masking the OOM-Killer doesn't fix your issue, it's easy to undo the change and return to the default settings. Here's how:
Step 1: Unmask the OOM-Killer
To re-enable the OOM-Killer, type the following command in your terminal and press Enter:
sudo systemctl unmask systemd-oomdStep 2: Reboot Again
As before, you may need to reboot your system to apply the changes:
sudo rebootIs It Safe to Disable the OOM-Killer?
Disabling the OOM-Killer generally solves the problem of Ubuntu crashing to the login screen, but it comes with some trade-offs. Without the OOM-Killer, your system might run into low-memory situations without automatically terminating apps, which can lead to a sluggish system. However, most modern systems have enough memory (especially with 8GB or more) to handle typical workloads without running into severe memory issues.
If your system shows a significant error when memory runs low, you might need to manually close some applications to free up resources.
Final Thoughts
Crashing back to the login screen on Ubuntu can be a huge headache, especially when you lose all your open applications. Fortunately, for many users, masking the OOM-Killer provides a reliable fix. This solution is quick and reversible, making it a great troubleshooting step if you're experiencing desktop crashes.
Remember, while this might not solve every crash issue, it's an easy and effective first step. If it doesn’t work, you can always unmask the OOM-Killer and explore other potential causes for your system instability.
Give it a try, and hopefully, you'll be able to enjoy a more stable Ubuntu experience!
Does My Processor Support AVX2?
If you're interested in running AI instances locally on your Linux-based laptop or PC or perhaps compiling software that leverages your CPU's full potential, one key thing you’ll want to check is whether your processor supports AVX2 (Advanced Vector Extensions 2). Understanding this is crucial, especially if you're optimizing your machine for high-performance tasks such as machine learning, data analysis, or real-time video processing.
In this article, we’ll explore how to check if your processor supports AVX2, what AVX2 is, why it’s important, and how you can verify it on Ubuntu or other Linux distributions.
What is AVX2 and Why Does It Matter?
AVX2 is an extension to the original AVX instruction set introduced by Intel. It was released with Intel’s Haswell processors and has become standard in most CPUs produced since then. AVX2 significantly improves integer operations and adds support for more complex floating-point calculations, which are crucial for AI workloads, deep learning models, and heavy computational tasks.
Here’s why AVX2 matters for your AI projects and high-performance applications:
- Faster Processing: AVX2 can speed up operations like matrix multiplications, which are essential in AI and machine learning workloads.
- Efficient Resource Usage: It allows your processor to handle multiple data points in a single instruction cycle, reducing the time and resources needed to process large datasets.
- Optimization in Software: Many AI frameworks and software, such as TensorFlow or PyTorch, often use AVX2 to enhance performance during model training and inference.
Thus, if you're planning to run or compile AI software locally on your Linux machine, you need to know if your processor supports AVX2.
How to Check If Your Processor Supports AVX2 on Linux
Step-by-Step Process
If you're asking, “Does my processor support AVX2?”, you can quickly check by using a simple command in your terminal. This method works on Ubuntu and most other Linux distributions.
- Open the terminal on your Linux machine.
- Run the following command to view your CPU’s features:
cat /proc/cpuinfo | grep avx2This command looks for the avx2 flag in the output of your CPU’s information. The CPU flags section lists all the features supported by your processor, and AVX2 will appear there if supported.
Interpreting the Output
- If AVX2 is listed, congratulations! Your processor supports AVX2, and you can use this instruction set for optimizing AI applications.
- If AVX2 is not present, your CPU likely doesn’t support this feature, and you may need to reconsider some optimizations or upgrades, especially if you plan to use software that relies on AVX2 for better performance.
Here’s an example of what the output might look like:
flags: fpu vme de pse tsc msr pae mce cx8 sep mtrr pge avx2If AVX2 is highlighted in your flags, you're good to go!
Why is AVX2 Important for Running AI Locally?
Now that you know how to check whether your processor supports AVX2, let’s discuss why it’s especially relevant for running AI on local machines.
AI workloads, particularly deep learning models, require intensive numerical computations. Training a model involves processing large matrices of data (think of layers of neurons in neural networks), and AVX2 helps speed up these operations. It is commonly used by AI frameworks like TensorFlow, PyTorch, and ONNX to enhance their performance, especially when dealing with large datasets or real-time inference tasks.
For those looking to train AI models at home on a laptop or desktop, AVX2 support can make a significant difference in how quickly your models train and how efficiently your machine runs. Many precompiled binaries of AI frameworks are optimized to take advantage of AVX2, allowing them to run more smoothly on supported hardware.
How to Use the AVX2 Flag When Running or Compiling Software
Once you've confirmed that your processor supports AVX2, the next step is utilizing it effectively.
- Running Software: Some AI software will automatically detect AVX2 support and optimize accordingly. However, in some cases, you may need to explicitly specify AVX2 during the compilation or execution phase. This ensures that the software takes full advantage of your CPU’s capabilities.
- Compiling Software with AVX2: When compiling from source, you can often specify CPU architecture flags to optimize performance. For instance, you might use:
-march=native -mavx2These flags tell the compiler to generate code that uses AVX2 instructions if supported by your CPU.
Final Thoughts: Does My Processor Support AVX2?
If you're serious about optimizing your machine for AI workloads or other intensive computing tasks, the question “Does my processor support AVX2?” is one you’ll need to answer early on.
By using the cat /proc/cpuinfo | grep avx2 command in Linux, you can easily check for AVX2 support and ensure your processor can handle the demands of high-performance software.
AVX2 is a powerful feature for users running AI instances or compiling software on local Linux systems. Having this capability can drastically improve performance, especially when working with large-scale data or training deep-learning models. So, make sure your processor is up to the task before diving into those heavy AI workloads!
By checking for AVX2 support, you're taking the first step toward fully optimizing your system for AI tasks. Whether you're a developer, data scientist, or hobbyist looking to run local AI instances, AVX2 can make a notable difference in your system's performance.
How to Flip Your Monitor Screen Upside Down on Ubuntu: A Simple Guide
Have you ever wanted to flip your monitor screen upside down? Whether it's for a quirky setup or an intentional productivity boost, Ubuntu makes this process surprisingly easy. In this guide, I’ll walk you through how to flip your screen orientation in just a few clicks.
Why Flip Your Screen?
Flipping your screen might sound strange, but it can be useful for:
- Vertical setups for coding or reading documents.
- Creative use cases like screen mirroring setups.
- Fun or novelty purposes, especially in multi-monitor arrangements.
- Fixing display issues where your screen appears upside down unintentionally.
- Custom display orientation for business information panels.
Regardless of the reason, here's how to do it in Ubuntu.
Steps to Flip Your Screen Upside Down in Ubuntu
- Open the Settings Menu
First, navigate to the Settings app on your Ubuntu machine. You can find it by clicking on the system menu in the top-right corner of the screen and selecting "Settings." - Go to Display Settings
Once you're in the Settings window, scroll down the sidebar and click on Displays (sometimes labeled as Screen Display in older versions of Ubuntu). - Adjust Screen Orientation
Under the Display section, you’ll see an option for Orientation. The default option is usually set to "Landscape." To flip your screen upside down, select Landscape (Flipped) from the dropdown menu. - Apply the Changes
After selecting the flipped orientation, click Apply to save the changes. Your screen will now flip upside down. - Confirm the Change
A confirmation box will pop up, asking if you'd like to keep these display settings. If everything looks good, click Keep Changes. If not, you can select Revert to return to the original orientation.

Troubleshooting
- If the screen orientation doesn’t change after applying the settings, check if you’re using the correct display if you have a multi-monitor setup.
Final Thoughts
Flipping your screen upside down in Ubuntu is a quick and easy process that can be done through the Settings app or with a keyboard shortcut. Whether you’re trying it out for fun or for a specific purpose, such as a specially mounted display, Ubuntu gives you the flexibility to adjust your screen orientation with ease.
Happy screen flipping!
Bring back the Desktop Icons to Show in Gnome (Ubuntu)
As Gnome and Ubuntu evolve, some settings change and features users have come to rely on may no longer work as expected. A recent upgrade to Ubuntu left many users scratching their heads when Gnome Classic's desktop icons disappeared without warning. Fortunately, there's a simple fix for this issue.
In earlier versions of Gnome, users had desktop icons enabled by default, but this functionality was removed in more recent updates. Now, if you’ve upgraded to the latest version of Ubuntu and noticed that your beloved desktop icons are gone, don’t worry — you’re not alone. This article walks you through the steps to restore desktop icons in Gnome using a handy extension.
Why Did Desktop Icons Disappear?
Gnome, which has been the default desktop environment for Ubuntu, is constantly evolving to provide a more streamlined and modern experience. As part of this, desktop icons were removed from the core functionality to adhere to Gnome's philosophy of minimalism and a clutter-free workspace. However, many users still prefer the traditional desktop layout with icons, and Gnome has extensions that allow you to restore this feature.
Restoring Desktop Icons in Gnome
To bring back the desktop icons, you’ll need to use an extension called Desktop Icons NG (DING). Here’s how you can easily get it up and running.
Steps to Enable Desktop Icons:
- Visit the Gnome Extensions Website:
Head over to the Gnome Extensions site to find the Desktop Icons NG (DING) extension. - Install the Gnome Shell Integration Browser Extension:
If it’s your first time using Gnome extensions, you may be prompted to install the Gnome Shell Integration browser extension. This plugin allows you to interact with Gnome's extensions from within your web browser. - Toggle the Desktop Icons NG (DING) Extension On:
Once on the extension page, you’ll see a toggle switch in the top-right corner. Simply click this to turn the extension from 'off' to 'on'. Doing so will install and activate the desktop icons feature. - Log Out and Log Back In:
To apply the changes, log out of your current session and log back in. Upon returning, you should see your desktop icons restored on the Gnome Classic desktop.
Additional Features of Desktop Icons NG (DING)
Desktop Icons NG doesn’t just restore the basic desktop icon functionality; it also offers additional features to enhance your desktop experience. Some of these include:
- Drag-and-Drop Support: You can easily drag files, folders, and applications to your desktop for quick access.
- Context Menus: Right-clicking on an icon brings up a context menu where you can rename, delete, or move the item.
- Customizable Layouts: You can adjust the spacing and size of your desktop icons according to your preferences.
- Trash and Mounted Devices: The extension supports showing mounted drives and a trash bin on the desktop, much like traditional desktop environments.
Why Use Gnome Extensions?
Gnome’s extensions ecosystem allows users to customize their desktop environment to better suit their workflow. Whether it's enabling desktop icons, adding system monitors, or tweaking visual settings, Gnome extensions are an essential tool for anyone who wants to fine-tune their Ubuntu experience.
The Desktop Icons NG (DING) extension is a prime example of how extensions can bring back features that some users may miss from previous Gnome versions, all while staying compatible with Gnome's overall design philosophy.
Final Thoughts
If you miss seeing desktop icons on your Gnome Classic desktop after upgrading to a newer version of Ubuntu, the solution is just a few clicks away. The Desktop Icons NG (DING) extension provides an easy fix that can be quickly enabled through the Gnome Extensions website. With this extension, you’ll be able to enjoy a more traditional desktop experience while still benefiting from all the improvements and innovations Gnome brings.
Let us know in the comments if this solution worked for you, or if you’ve found other ways to bring desktop icons back to your Ubuntu setup!
There is an orangey pinky hue to the Ubuntu desktop.
Software
To prove it's a software problem, reboot the computer and the BIOS/GrubLlogin screen will all look normal. The correct level of colour is present, and things only go pink after you have logged in.
With a software problem, the fault only appears after you have logged in and does not appear in the BIOS boot screen or grub menu.
Fix
Now for the pinky, orangey or even rose-tinted Ubuntu desktop fix.
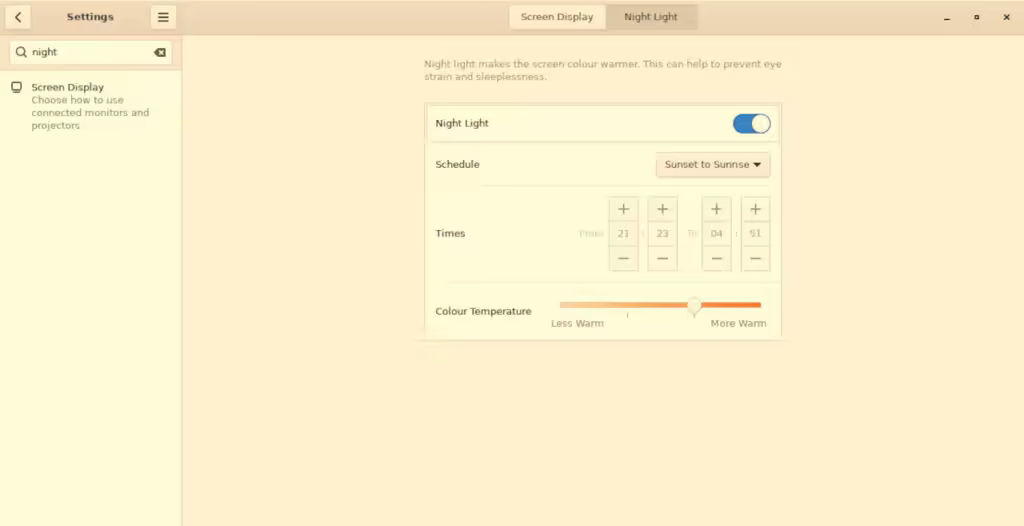
Navigate to the settings and search for 'Night Light'.
Switch the night light option to OFF (grey button showing) from the ON (blue button showing).
Your screen should now return to its proper colours and the pinky, orange hue disappears.
Rose Tinted
Different displays can render the colour slightly differently, it could have an orange hue or a pink hue. The brightness slider still changes the brightness but it doesn't get to the full (100%) brightness than with the Night Light off. Tilting the laptop gave different shades and intensity of the colored tint and it took a while to work out what was happening.
How
Someone had set the 'night light' to come on at a pre-set time of day, altering the colour temperature of the screen to reduce the blue and increase the warmer colours.
Why?
An amber light on the computer screen, often referred to as "night mode" or "blue light filter," is used in the evenings for several reasons:
1. Reducing Eye Strain
- Less Blue Light: Amber light reduces the amount of blue light emitted by the screen. Blue light can cause eye strain, especially during prolonged use.
- Comfortable Viewing: The warmer tones of amber light are easier on the eyes in low-light environments, making screen time more comfortable.
2. Improving Sleep Quality
- Circadian Rhythms: Blue light can disrupt the body's natural circadian rhythms by suppressing the production of melatonin, a hormone that regulates sleep. Using amber light helps maintain natural sleep cycles.
- Better Sleep: By reducing blue light exposure in the evenings, it becomes easier to fall asleep and maintain a healthy sleep pattern.
3. Enhancing Visual Comfort
- Reduced Glare: Amber light can reduce glare from the screen, which is particularly beneficial in dim lighting conditions.
- Eye Relaxation: The warmer hues are less jarring than the bright, cool tones of blue light, allowing for a more relaxed viewing experience.
4. Preventing Digital Eye Fatigue
- Minimized Digital Eye Strain: Prolonged exposure to blue light from screens can lead to digital eye fatigue, characterized by dryness, irritation, and difficulty focusing. Amber light helps mitigate these symptoms.
- Longer Comfortable Use: With reduced strain, users can comfortably spend more time on their devices without experiencing significant discomfort.
5. Healthier Computer Use Habits
- Encourages Breaks: The subtle shift to warmer tones can remind users to take regular breaks, promoting healthier computer use habits.
- Overall Well-being: Reducing blue light exposure not only aids in eye health but also contributes to overall well-being by supporting better sleep and reducing stress on the eyes.
In summary, using an amber light on the computer screen in the evenings helps reduce eye strain, improve sleep quality, enhance visual comfort, prevent digital eye fatigue, and promote healthier computer use habits.
Idea
Maybe it seemed like a good idea at the time but it was very distracting while making the viewing angle very tight on the old laptop screen.
You may see some very old browsers or misconfigured UserAgents for browsers in your logs. These odd user agents are seen visiting from IP addresses and ASNs linked to Hosting companies.
You can expect these to be some bot, a computer script that visited websites for whatever reason the person that has decided to do that for. These bots that try to hide genuine human visitors provide no benefit but do take up resources that could be used to show pages to genuine visitors.
User-Agent Header
The User-Agent header can be set to almost anything you like; it can even be 'blank' and not contain any information. The User-Agent is helpful but not to be relied upon for genuine information. The helpfulness comes with the information that describes the type of rendering engine and capabilities the browser has. This means the website could tailor the page to match the capabilities of the browser. Less useful now because the web has moved forward, but back in the early days of the World Wide Web, the UA - User-Agent header in the browser was a helpful hint. There are extensions for Chrome and Firefox that make altering the User-Agent a simple task.
Why?
Why use an old, misconfigured or incorrect User agent to identify a bot? The only reason for a computer program to be configured to masquerade as a genuine human is to hide in plain sight. To slip through security filters to trick web admins into thinking these user agents are linked to real human visitors. Why do they make spelling or configuration mistakes? I don't know, but it could be just laziness or a way to leave their mark.
Good bots
Good bots can be helpful, like the well-known Google Bots that crawl pages to index content for their search engine. The Google bots clearly identify themselves, so it is easy to block them and count the visits. This is a good example of a good bot, and no deception is employed in the visits.
Lists
Here are a few of those User Agents seen in the wild that look like human visitors with old or unusual browsers but come from Hosting addresses linked to spam, scraping and probing.
- Mozilla/5.0 (Macintosh; Intel Mac OS X 10_10_1) AppleWebKit/600.1.25 (KHTML, like Gecko) Version/8.0 Safari/600.1.25
- Mozilla/6.4 (Windows NT 11.1) Gecko/2010102 Firefox/99.0
- Mozilla/5.0 (Windows NT 10.0; Win64; x64; rv:71.0) Gecko/20100101 Firefox/71.0
- Mozilla/5.0 (Macintosh; Intel Mac OS X 10_15_7) AppleWebKit/537.36 (KHTML, like Gecko) Chrome/91.0.4472.164 Safari/537.36 (2b7146e2-bc0c-4240-ae78-608c0c43c275)
- Mozilla/5.0 (Windows NT 6.2; WOW64) AppleWebKit/537.36 (KHTML, like Gecko) Chrome/53.0.2785.104 Safari/537.36 Core/1.53.3103.400 QQBrowser/9.6.11372.400
- Mozilla/5.0 (Windows NT 10.0; Win64; x64) AppleWebKit/537.36 (KHTML, like Gecko) Chrome/112.0.0.0 Safari/537.36
- Mozilla/5.0 (Windows NT 10.0; Win64; x64) AppleWebKit/537.36 (KHTML, like Gecko) Chrome/116.0.0.0 Safari/537.36
- Mozilla/5.0 (Macintosh; Intel Mac OS X 10_12_6) AppleWebKit/537.36 (KHTML, like Gecko) Edge/76.0.1655.82 Safari/537.36
- Mozilla/5.0 (Windows NT 10.0; Win64; x64) AppleWebKit/537.36 (KHTML, like Gecko) Chrome/70.0.3538.102 Safari/537.36 Edge/18.19577
- Mozilla/5.0 (Windows NT 6.3; Win64; x64) AppleWebKit/537.36 (KHTML, like Gecko) Chrome/48.0.2564.109 Safari/537.36
- Mozilla/5.0 (Windows NT 10.0; Win64; x64) AppleWebKit/537.36 (KHTML, like Gecko) Chrome/99.0.4844.82 Safari/537.36
- Mozilla/5.0 (Windows NT 10.0; WOW64) AppleWebKit/537.36 (KHTML, like Gecko) Chrome/57.0.772.39 Safari/537.36
- Mozilla/5.0 (X11; Linux x86_64) AppleWebKit/537.36 (KHTML, like Gecko) Chrome/67.0.2925.105 Safari/537.36
- Mozilla/5.0 (Windows NT 6.1) AppleWebKit/537.36 (KHTML, like Gecko) Chrome/58.0.3029.110 Safari/537.36 OPR/45.0.2552.898
- Mozilla/5.0 (Windows NT 6.1; WOW64) AppleWebKit/537.36 (KHTML, like Gecko) Chrome/38.0.2125.122 Safari/537.36 SE 2.X MetaSr 1.0
- Mozilla/5.0 (Windows NT 6.1) AppleWebKit/537.36 (KHTML, like Gecko) Chrome/41.0.2228.0 Safari/537.36
- Mozilla/5.0 (Windows NT 6.1; WOW64) AppleWebKit/537.36 (KHTML, like Gecko) Chrome/103.0.0.0 Safari/537.36
- Mozilla/5.0 (Windows NT 6.1; WOW64) AppleWebKit/537.22 (KHTML, like Gecko) Chrome/25.0.1364.5 Safari/537.22
- Mozilla/5.0 (X11; Linux x86_64) AppleWebKit/537.36 (KHTML, like Gecko) Chrome/34.0.1847.76 Safari/537.36
- Mozilla/5.0 (Macintosh; Intel Mac OS X 10_8_4) AppleWebKit/537.36 (KHTML, like Gecko) Chrome/49.0.2656.18 Safari/537.36
- Mozilla/5.0 (Macintosh; Intel Mac OS X 10_13_4; rv:82.0) Gecko/20100101 Firefox/82.0
- Mozilla/5.0 (Macintosh; Intel Mac OS X 10_14_4) AppleWebKit/537.36 (KHTML, like Gecko) Chrome/83.0.4103.116 Safari/537.36
- Mozilla/5.0 (Macintosh; Intel Mac OS X 10_15_5; rv:76.0) Gecko/20100101 Firefox/76.0
- Mozilla/5.0 (Macintosh; Intel Mac OS X 10_15_7) AppleWebKit/537.36 (KHTML, like Gecko) Chrome/103.0.0.0 Safari/537.36
- Mozilla/5.0 (Macintosh; Intel Mac OS X 10_15_7) AppleWebKit/537.36 (KHTML, like Gecko) Chrome/119.0.0.0 Safari/537.36
- Mozilla/5.0 (Macintosh; Intel Mac OS X 10_15_7) AppleWebKit/537.36 (KHTML, like Gecko) Chrome/114.0.0.0 Safari/537.36
- Mozilla/5.0 (Macintosh; Intel Mac OS X 11_2_1) AppleWebKit/537.36 (KHTML, like Gecko) Chrome/79.0.3945.74 Safari/537.36 Edg/79.0.309.43
- Mozilla/5.0 (Windows NT 6.1; Win64; x64; rv:87.0) Gecko/20100101 Firefox/87.0
- Mozilla/5.0 (Windows NT 6.2; Win64; x64) AppleWebKit/537.36 (KHTML, like Gecko) Chrome/103.0.0.0 Safari/537.36
- Mozilla/5.0 (Windows NT 6.3; Win64; x64) AppleWebKit/537.36 (KHTML, like Gecko) Chrome/71.0.3578.98 Safari/537.36
- Mozilla/5.0 (X11; Linux x86_64) AppleWebKit/537.36 (KHTML, like Gecko) Chrome/80.0.3987.149 Safari/537.36
- Mozilla/5.0 (Windows NT 10.0; Win64; x64) AppleWebKit/537.36 (KHTML, like Gecko) Chrome/89.0.4389.114 Safari/537.36
- Mozilla/5.0 (Windows NT 10.0; Win64; x64) AppleWebKit/537.36 (KHTML, like Gecko) Chrome/112.0.0.0 YaBrowser/23.5.3.904 Yowser/2.5 Safari/537.36
- Mozilla/5.0 (Windows NT 10.0; WOW64) AppleWebKit/537.36 (KHTML, like Gecko) Chrome/103.0.5060.114 Safari/537.36
- Mozilla/5.0 (X11; Linux x86_64; rv:80.0) Gecko/20100101 Firefox/80.0
- Mozilla/5.0 (X11; Ubuntu; Linux x86_64; rv:72.0) Gecko/20100101 Firefox/72.0
- Opera/9.80 (Macintosh; Intel Mac OS X 10_13_6; U; en) Presto/2.2.15 Version/10.10