
Free images tag: Error
Understanding Password Leaks: What You Need to Know
Password leaks are a growing concern in today’s digital world, putting personal information and sensitive accounts at risk. In this blog post, we’ll explore what password leaks are, how they happen, and the steps you can take to protect yourself.
What is a Password Leak?
A password leak occurs when a database containing usernames and passwords is exposed, either due to a cyberattack, human error, or weak security measures. These leaks often result in credentials being sold or shared on the dark web, leading to unauthorized access to accounts.
Common Causes of Password Leaks
- Data Breaches: Hackers target organizations to steal user databases.
- Poor Security Practices: Weak encryption or lack of encryption makes it easier for attackers to access stored passwords.
- Phishing Attacks: Users are tricked into providing their passwords on fake websites.
- Insider Threats: Employees or contractors with access to sensitive information may accidentally or maliciously expose passwords.
How to Protect Yourself from Password Leaks
- Use Strong, Unique Passwords: Avoid using easily guessable passwords like “123456” or “password.” Make your passwords a mix of letters, numbers, and special characters.
- Enable Two-Factor Authentication (2FA): Adding an extra layer of security ensures that even if your password is leaked, your account is still protected.
- Regularly Change Passwords: Periodically update your passwords, especially for critical accounts like email and banking.
- Use a Password Manager: Password managers generate and store strong, unique passwords for each of your accounts, reducing the risk of reuse.
- Monitor Your Accounts: Use services like Have I Been Pwned to check if your email or passwords have been compromised in known leaks.
Using Have I Been Pwned
One of the easiest ways to check if your email or passwords have been compromised is by using Have I Been Pwned. This free service allows you to:
- Check if your email address has appeared in any known data breaches.
- Identify which websites or services were involved in the breach.
- Get notified when your information is found in a new breach.
To use Have I Been Pwned, simply visit their website, enter your email address, and review the results. If your information has been compromised, follow the recommended steps to secure your accounts.
What to Do If Your Password is Leaked
- Change Your Password Immediately: Update the affected account’s password and any other accounts where the same password was used.
- Enable 2FA if Not Already Done: This adds an extra layer of protection against unauthorized access.
- Monitor for Suspicious Activity: Keep an eye on your account for unusual transactions or login attempts.
- Notify the Service Provider: Let the affected organization know about the leak so they can take necessary measures.
The Role of Organizations in Preventing Password Leaks
Organizations have a responsibility to protect user data by implementing strong security practices, such as:
- Using robust encryption methods to store passwords.
- Conducting regular security audits and penetration tests.
- Educating employees on security best practices.
- Promptly addressing vulnerabilities.
Conclusion
Password leaks are a serious issue, but with proactive measures, individuals and organizations can significantly reduce their risk. By staying vigilant and adopting strong security practices, you can help protect your personal information and maintain peace of mind in the digital age.
Why Ubuntu Keeps Crashing Back to the Login Screen: Understanding the OOM-Killer and How to Disable It
If you're using Ubuntu and have experienced the frustration of your system crashing back to the login screen—only to find that all your open apps have disappeared—you’re not alone. This issue, often referred to as a "desktop crash," can be incredibly disruptive. You might think your system is overloaded or something is wrong with the hardware, but even machines with 8GB or 16GB of RAM running modern versions of Ubuntu can suffer from this problem.
In many cases, the culprit is Ubuntu's OOM-Killer (Out Of Memory Killer), a system process that terminates applications when the operating system detects low memory. While this is intended to protect your system, it can sometimes lead to over-aggressive app termination, even when it seems like there’s plenty of RAM available. Fortunately, there’s a workaround for this issue—masking the OOM-Killer can effectively stop these crashes.
In this blog, we’ll explore why this happens and walk you through a simple solution: disabling the OOM-Killer. Don't worry; this is a beginner-friendly guide with step-by-step instructions.
Why Does Ubuntu Crash Back to the Login Screen?
Ubuntu is designed to manage system resources like memory (RAM) efficiently. When your system runs low on memory, the OOM-Killer steps in and forcibly closes applications to free up RAM. This is typically a good thing, as it prevents the system from freezing or becoming unresponsive. However, in some cases, the OOM-Killer is too eager to terminate processes, and it ends up closing the desktop environment itself, which brings you back to the login screen and kills all your open apps in the process.
Here are some reasons this might happen:
- Resource-Intensive Applications: Running many applications simultaneously (or memory-hungry ones like video editors) can trigger the OOM-Killer, even if you have a decent amount of RAM.
- Background Processes: Sometimes, background services consume more memory than expected.
- Kernel Mismanagement: The kernel might incorrectly calculate the system's memory usage, causing the OOM-Killer to be triggered unnecessarily.
Even with 8GB or 16GB of RAM, users have reported frequent desktop crashes where they are suddenly logged out, losing all unsaved work. The problem seems especially prevalent in recent Ubuntu releases.
The Solution: Masking the OOM-Killer
A proven solution to stop these crashes is to mask (disable) the OOM-Killer from running. Masking a process in Linux effectively disables it, and in this case, it stops the OOM-Killer from terminating your desktop environment.
After masking the OOM-Killer, users have reported that their Ubuntu machines continue to run for days without issues—no crashes, no sudden logouts, and no loss of apps.
However, note that disabling the OOM-Killer comes with a warning: in some cases, Ubuntu may attempt to kill the desktop environment, but instead of crashing, the system will continue to work and display an error report.
How to Disable the OOM-Killer: A Step-by-Step Guide
If you want to give this solution a try, follow these simple steps. Remember, this change is reversible, so if it doesn’t work for your system, you can always undo it.
Step 1: Open the Terminal
First, open your terminal by pressing Ctrl + Alt + T, or you can find it by searching "Terminal" in the Ubuntu menu.
Step 2: Mask the OOM-Killer
In the terminal, type the following command and press Enter:
sudo systemctl mask systemd-oomdThis command masks (disables) the OOM-Killer service, preventing it from running.
Step 3: Reboot Your System
After masking the OOM-Killer, you could restart your system but we found it unnecessary. You can reboot your system with this command:
sudo rebootOnce your system restarts, the OOM-Killer will no longer terminate applications, including your desktop environment.
What If This Doesn't Solve the Problem?
If masking the OOM-Killer doesn't fix your issue, it's easy to undo the change and return to the default settings. Here's how:
Step 1: Unmask the OOM-Killer
To re-enable the OOM-Killer, type the following command in your terminal and press Enter:
sudo systemctl unmask systemd-oomdStep 2: Reboot Again
As before, you may need to reboot your system to apply the changes:
sudo rebootIs It Safe to Disable the OOM-Killer?
Disabling the OOM-Killer generally solves the problem of Ubuntu crashing to the login screen, but it comes with some trade-offs. Without the OOM-Killer, your system might run into low-memory situations without automatically terminating apps, which can lead to a sluggish system. However, most modern systems have enough memory (especially with 8GB or more) to handle typical workloads without running into severe memory issues.
If your system shows a significant error when memory runs low, you might need to manually close some applications to free up resources.
Final Thoughts
Crashing back to the login screen on Ubuntu can be a huge headache, especially when you lose all your open applications. Fortunately, for many users, masking the OOM-Killer provides a reliable fix. This solution is quick and reversible, making it a great troubleshooting step if you're experiencing desktop crashes.
Remember, while this might not solve every crash issue, it's an easy and effective first step. If it doesn’t work, you can always unmask the OOM-Killer and explore other potential causes for your system instability.
Give it a try, and hopefully, you'll be able to enjoy a more stable Ubuntu experience!
SMARTY mobile service can give you this apologetic, yet unhelpful recorded message repeatedly if you use their service.
SIMS
It can be possible to make a call to the same number from a different number, even from the same phone using a different SIM. Dual SIMS works well for this, but just a friend's phone is useful to prove the problem is with SMARTY and not the number or the phone.
Testing
But, is it? Are you sure you are testing the number? Typing the same number into two different phones, one that gives a recorded message 'Sorry, you have not been given access to this service' (SMARTY) and the other that connects the call would make you think there is a problem with SMARTY being unable to connect the call.
Connect
One network will connect the call while another doesn't. What gives?
The problem is the message is misleading. 'You have not been given access to this service' indicates a restriction on your account, like a premium rate or non-geographical restriction. The help will suggest adding credits for out-of-plan calls. But a better message could be 'Uncable to connect the call'
The new message would lead you to double-check the number and confirm it with the contact or even Google search.
We found our SMARTY was not connected to the caller and we got the recorded announcement 'Sorry, you have not been given access to this service' when there were too many digits on the phone number.
But why would the call connect on GIFFGAFF?
The phone number has two additional digits at the end of the number, these are rejected by giffgaff anf the call is connected. SMARTY will take the complete number, including any additional digits, and fail the call with an apology.
Luckily, the additional digits were at the end of the number and not anywhere else, which would have caused a wrong number for any network provider.
Advice
Check that the number has the correct number of digits and don't read too much into the message from SMARTY 'Sorry, you have not been given access to this service' because it may be misleading you. Check the number is correct, there are no additional digits that upset SMARTY (but others ignore them).
Conclusion
SMARTY handles errors in numbers differently than other operators. The message you hear may be misleading you. Double-check and check again the number you are dialing. Any error can give you this anncoucment.
Random-looking things appearing in the logs are explained.
Breakdown
Here is a breakdown of the code step by step. This code is an example of an SQL injection attempt, and it's designed to manipulate an SQL query.
and/**/convert(int,sys.fn_sqlvarbasetostr(HashBytes('MD5','1212093799')))>'0
and: This is a logical operator used to combine conditions in SQL queries./**/: This is an attempt to use a comment in the SQL code. In SQL,/*and*/are used to denote comments, and in some cases, attackers may try to use them to bypass input validation.convert(int, sys.fn_sqlvarbasetostr(HashBytes('MD5', '1212093799')): This part is an attempt to manipulate the SQL query by converting a value to an integer.sys.fn_sqlvarbasetostr(HashBytes('MD5', '1212093799')): This part is trying to calculate the MD5 hash of the string '1212093799' and then convert it to a string.HashBytesIt is a function that calculates the hash of a value andsys.fn_sqlvarbasetostris used to convert this hash to a string.convert(int, ...): The attacker is then trying to convert the resulting string to an integer. This conversion may result in an error if the string is not a valid integer.>'0": This is a comparison condition. It's checking if the result of the conversion to an integer is greater than the integer0. The trailing double quotation mark (") at the end appears to be an attempt to complete a string or escape the SQL query.
Manipulate SQL
The goal of this code is to try to manipulate an existing SQL query by injecting a subquery that calculates the MD5 hash of a specific string, converts it to an integer, and checks if the result is greater than zero. If the condition is true, it suggests that the SQL injection attempt was successful and might grant unauthorized access or reveal information from the database.
Malicious Activity
This code represents malicious activity and is typically illegal and unethical. To prevent SQL injection attacks, websites and applications should use security measures such as input validation, parameterized queries, and stored procedures.
You are expecting to see a video, but all you get is this message in white text on a black background: 'This video has not been configured to be allowed on this domain.'
The error messages relates to a Cloudflare-hosted video, and it is in the control of the webmaster. If you are a visitor to the site, then there is nothing you can fix. If there is a way of contacting the webmaster, then you can alert them to the problem and link to this post if you think it will help.
Webmasters
If you are a webmaster and have added a Cloudflare stream video to your site, and you receive this message, there are a couple of things you can do to see where the problem lies.
The Fix
Firstly
From within the Cloudflare accounts panel, use the left-hand menu panel to find Stream/Video. Find the 'Allowed Origins' box, delete the domain so the box is blank, and save your changes.
Observe if the video now plays on your website.
You don't want to leave the 'Allowed Origins' box blank for long as anyone can hotlink your video and run up your video hosting bill to Cloudflare. So, do a few refreshes of the site and see if the video works.
If your video plays, you can go back to the 'Allowed Origins' box and enter the correct domain that is hosting the player code.
Secondly
If you have identified the video can play correctly on your site when the 'Allowed Origins' is empty, and you do not get the 'This video has not been configured to be allowed on this domain.' message, you should do a further check in Cloudflare panel.
Cloudflare Settings
Use the left-hand menu to navigate to 'Rules', 'Transform Rules', 'Managed Transforms', and set 'Add security headers' to X - not enabled.

With the 'Add security headers' no longer enabled, refresh the page with your Cloudflare stream video code and wait for the video to start.
Stream Broken
Add security headers
Adds several security-related HTTP response headers providing cross-site scripting (XSS) protection.
Enabling this security feature in Cloudfare can break the Cloudflare stream video from working on your site if you specify a domain for the video to show on.
If you are running your website on Plesk and want to view the visitor statistics, you can use the AWStats program that reads the relevant log files and produces nice HTML tables of visitors and their relevant numbers.
AWStats
AWStats is installed by default on Plesk hosting. You can set the login page for the stats to be protected by your FTP password and FTP username. This is a nice security, so only authorized can view your site's stats.
But how do you find these AWStats? They don't appear in the Plesk control panel, and there is no information on how to see the reports that AWStats produces.
Viewing the AWStats on Plesk
To view the pretty HTML AWStats on a Plesk-hosted site, navigate to:
http://your-site.com/plesk-stat/webstat
You will be given a login screen and enter your FTP details if you have selected to protect the AWStats with your FTP credential.
What you will see now will vary between sites.
You may see a 403 error with a dropdown box to select the reporting period.
You may see the AWStats and virtually no traffic, maybe many zeros, or very few visitors.
You may see your traffic as expected.
403 error or zero traffic
If Plesk AWStats is giving you a 403 error, but you have logged in and have the select period drop-down box or you have virtually no traffic reported, possibly AWStats shows many zeros, you can try this link:
https://your-site.com/plesk-stat/webstat-SSL
You should now see a more relevant representation of your site's traffic in AWStats HTML.
SSL vs HTTP
Awstats separates reporting between SSL and non-SSL traffic. If you get a 403 or no traffic reported, then you are probably serving your site traffic through SSL, and you need to view the AWStats SSL-enabled link to see the numbers.
WordPress SEO checking tools can show 'Duplicate H1 tags'. Further investigation shows that the same H1 tag is used for page1/page2/page3 etc.
Duplicate H1
H1 is usually the site title and show the search engine what the most important part of the page is. This should be the top, the first paragraph of information should be the most relevant to the page title (H1) for maximum SEO effect.
Pagination
Pagination is the splitting up of many topics into manageable pages. WordPress can paginate the categories and tags. This pagination can make the page load more quickly because only a few previews of the tag or category are loaded for each page. But the problem is the same H1 tag is reused for every page.
Multiple H1
Having the same H1 on different pages gives the error of Duplicate H1 tags. The different pages are just the same category or tag list broken into pages, but it is still flagged as an SEO error. Thankfully its not a difficult fix if your theme supports it.
Fix for Duplicate H1
The fix for duplicate H1 on wordpress for category and tag pages can be achieved by adding a page number to the H1 description.
If you are using a TagDiv theme, like Newspaper you can find the setting in its template editor.
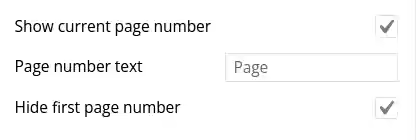
Three key settings will fix the duplicate H1 due to pagination in categories and they are:
- Show current page number
- Page number text
- Hide first page number
Show current page number (☑) will append the current page number to the H1 tag text. This makes each page to have a unique H1 text.
Page number text is for you to change if you don't want to add the word 'Page' to the H1. You may have already use the word 'page' and something different can fit better. You can just leave it as default.
Hide first page number is pretty neat. The fist page H1 won't be altered. Only page 2, 3 etc will show page number. This will leave your H1 exactly as you wanted it to be for the first page. Subsequent pages of the same category and tag will have page numbers appended.
You get unique H1 categories and tags in a few clicks. Job done.
Final
After saving the changes your category and tag titles will now look like:
- SEO Description H1
- SEO Description H1 - Page 1
- SEO Description H1 - Page 2
- SEO Description H1 - Page 3
- .....
You get a unique H1 tag for every category and tag page when they have been broken up into multiple pages for easier reading and quicker page loading.
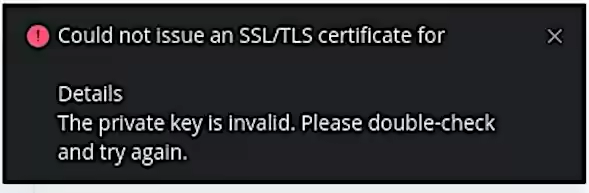
Uploading the cloudflare .pem file to plesk gives an error :
Could not issue an SSL/TLS certificate for yourdomain.com
Details
The private key is invalid. Please double-check and try again.
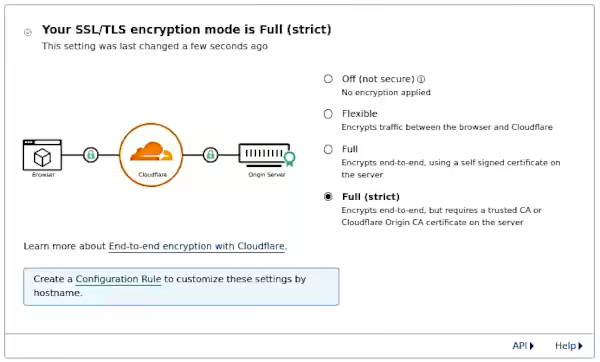
Cloudflare Full SSL
Adding the Cloudflare Origin Certificate to Plesk is used to provide encryption between Cloudflare and your origin server. Enabling this free SSL/TLS certificate will allow you to choose 'Full (Strict)' SSL.
Full (strict)
Encrypts end-to-end, but requires a trusted CA or Cloudflare Origin CA certificate on the server
Generate CF Origin Certificates and Private Keys
Generating the keys required for Full (Strict) is available in the cloudflare dashboard. The free SSL/TLS certificates are only useful for use with cloudflare hosted sites and need to be installed into the plesk server. Follow these cloudflare instructions to generate the Origin SSL keys. Don't navigate away from the screen with your private key. Copy and paste this into a .txt file and save it for future reference. You won't be able to view the private key again from within cloudflare.
Install SSL to Plesk
This is where the problems can start. What should be a very simple process can throw up an error that doesn't help much. Thankfully the solution is available and quick to implement. This solution will get the cloudflare SSL/TSL origin certificate and private key installed on your Plesk powered server.
When you choose to upload the .pem file supplied by cloudflare you get an error message 'The private key is invalid. Please double-check and try again.' Trying again doesn't solve the problem. There is also no mention of how to upload the cloudflare generated private key.
The Solution is to not use the upload buttons presented to you in Plesk server to add a .PEM file to the site. Do not use the feature of SSL/TLS certificate:
'Upload a certificate you already purchased
Where can I find the .pem file?'
Don't upload the .pem file.
Alternately the method of just copy and pasting the two cloudflare keys will work.
Adding the Certificate and Private Keys
From withing your Plesk server domain:
Navigate to: Websites & Domains, Security SSL/TLS Certificates, Advanced Settings (button), Add SSL/TLS Certificate (button).
You will arrive at the advanced, yet simple to use SSL/TLS installation page that bypasses the need for .pem files.

Give the certificate a name (to help you identify it from a list later)
Paste the full private key into the empty box labelled 'Private key (*.key) *'
-----BEGIN PRIVATE KEY-----
-----END PRIVATE KEY-----
Paste the full certificate into the empty box labelled 'Certificate (*.crt) *'
-----BEGIN CERTIFICATE-----
.......
-----END CERTIFICATE-----
Don't put anything in the empty box labelled 'CA certificate (*-ca.crt)', just leave it blank as this is not required.
Click the button 'Upload Certificate' and then follow the link to make this certificate active referencing the name you chose to identify it with earlier.
Cloudflare Full Strict Enable
With the .pem file installed to Plesk and selected as enabled you can now set the cloudflare setting to strict SSL (full) that will utilise the Origin SSL/TLS certificate you have just successfully installed and activated.