

Free images tag: Wordpress
Does Microsoft pay to show ads on your website?
Microsoft advertising has been missing for a long time from the list of advertisers that want to pay you to show their ads on your site. But things are changing.
Microsoft is inviting a number of small sites to join the waitlist for Microsoft Ads. These are ads for publishers of websites where a small snippet of code is included on your WordPress website blog to show ads to your visitors. You get paid for each time one of your visitors clicks an advertisement.
Ads
Microsoft Ads want to appeal to your visitors, so they will only show highly relevant and quality ads on your site through their code snippet. This way, you get the best price for every click because the advertisers will pay more for high-quality traffic from your site. Yes, you can make money from your blog!
Who can apply?
Microsofts BING! Ads are not just for huge traffic websites. They are looking for smaller blogs and sites. They are willing to work with 'any small publisher or blog looking to build their audience and make it profitable through native ads' (subject to approval). Yes, Microsoft wants to show ads on your site and pay you for the privilege.
Is my blog suitable for Microsoft ads?
Microsoft is looking for 'sites focused on travel, entertainment, sports, food, finance, auto, community, news, telecom, and others'. That's a fit for your website? Even the one you have not started yet.... Make space for Microsoft advertising.
Low traffic sites
Even if you don't have a very popular site, one that is very niche is being sought for advertising. Microsoft says that 'anyone looking to monetize their site with an easy code-on-page solution' and there are 'no revenue or volume minimums'. This is a good sign for smaller, more niche, lower-traffic blogs and sites.
Cost
So what does all this cost?
Microsoft says there is 'no cost to sign up'.
The advertising fee that Microsoft takes from the advertiser is split between the publisher (you) and themselves. The better and more relevant ads that Microsoft shows on your site, the more money they make and the more you receive.
Catch?
What's the catch?
Microsoft is only looking for US-based site owners, but they indicate that the service will be opened to other countries as the beta progresses.
How do you start to show Microsoft ads?
Easy, visit the Microsoft BING! Ads publisher page and fill out the form to join the waitlist.
Are you looking for a way to maximize your website's ad revenue without sacrificing user experience? Look no further than EZOIC.
EZOIC is an AI-driven platform that optimizes ad revenue and user experience for website owners. With their Ad Tester tool, you can automatically test and optimize ad placements, sizes, and types to increase revenue while ensuring a great user experience.
But that's not all. EZOIC's Site Speed Accelerator optimizes website speed to improve user experience and SEO ranking. At the same time, its Big Data Analytics suite provides insights and analytics on website performance, ad revenue, and user behavior.
With EZOIC, you'll have access to a suite of powerful tools that help you increase revenue and improve user experience, all backed by artificial intelligence and machine learning.
EZOIC offers easy integration with popular CMS platforms like WordPress, Joomla, and Drupal through their CMS Plugins, making it easy to get started and manage your ads.
If you're serious about maximizing your website's ad revenue while providing a great user experience, EZOIC is your platform. With a strong reputation in the industry and a track record of success, EZOIC is a trusted partner for website owners looking to improve their revenue and user experience.
Don't settle for mediocre ad revenue and a subpar user experience. Sign up for EZOIC today and take your website to the next level!
When your WordPress bullet point list looks too close together, the gap between entries must be expanded.
Having some space above and below each bullet point can make the page much easier to read and set each point apart from its neighbours.
It is quite a simple edit to make every bullet point list have a bit more breathing room, and you can fine-tune the breathing space each bullet point entry can have.
CSS
WordPress has a simple way to add CSS edits. These edits can be very powerful in altering the look and feel of your website. You can adjust with CSS, from colours to fonts to any element on the screen.
The CSS you need to make some space between the bullet point lists is:
.entry-content ul li {
    margin-bottom: 20px;
}
A straightforward bit of code can make a difference to your site. Easier to read the bullet point makes for happier visitors, and you get your point across better.
WordPress
To add the custom CSS to your WordPress, navigate the many to Appearance, then to Customize. from there, look for the Additional CSS menu. Click that to open the edit section. Paste the code above into the Customizing Additional CSS empty section. If some code is already in there, add it below the existing CSS edit.
Themes
Your theme will have a custom CSS entry section if the standard WordPress custom CSS isn't there or doesn't function. Check the theme control panel or help page for Custom CSS.
Adjustment
Change the number of px to adjust the spacing.
OK, maybe px is not ideal for a responsive world, so be free to edit the units if the mobile site looks bad but good on the desktop after testing. Let us know in the comments your enhancements to the solution above.
WordPress Categories or Tags
Search Engines March 26, 2023 0
Running a WordPress site can be rewarding. But getting to grips with the basics can be challenging. The difference between categories and tags is one example.
Should the post have a tag and a category, or which is best, a tag or a category?
What if I have the same tags as categories to ensure that at least one is correct?
Do I even need a category if the post has a tag?
Who sees these categories and tags on WordPress anyway?
Categories Vs Tags
It's Categories Vs Tags. Here is an example of how you can use categories and tags in WordPress effectively and boost your Search Engine Optimisation, not to mention an easier-to-navigate menu system. You have a menu, right?
Say we are discussing widgets.
Categories
There are three main types of widgets: the Red widget, the Blue widget, and the Green widget.
These are your categories.
The main chunks are your categories.
You can have more than 3 categories, but don't add optional extras as categories. If a new black, limited edition widget becomes available, add that to your categories.
Each post can have only one Category.
A widget is either Red, Blue, or Green; it can't be more than one color.
Tags
These would be your tags if each widget can be half-full, half-empty, full-fat, and sugar-free options.
You can assign more than one tag to a post. A half-full, sugar-free, full-fat widget is an option. It can have many tags.
Tags are like the options for a product; each post can have many tags but only one Category.
Another Example
If the colors in categories were confusing, try considering dresses. You may own a clothes shop specializing in dresses and want to blog about them. You could set up your WordPress tags and categories like this..
Categories
You sell 4 types of dress: evening wear, Summer wear, Winter wear, and dresses for Children.
These would be your four categories. It makes it easy for visitors to narrow down what they seek.
Tags
Tags would be colors and sizes of dresses available. Also, you can add further detailed tags about the neckline, fastenings, and the length available.
Each type of dress can come in many different colors and sizes with various fastenings and necklines. These would work well for tags as each dress in one Category can have many tags.
Menu Items
Remember the menu I mentioned earlier?
The categories make perfect menu items.
The categories across the top of the page, part of your main menu, make it easy for visitors to narrow down what they want. They know if it is for a child or evening wear (Category), maybe not what color or any detail, but the tags will help.
One Category, but many tags.
Don't duplicate tags into categories or categories into tags.
Happy Blogging!
How to add extra image information that doesn't exist in the original?
How to make a square picture fit a rectangle for page banner?
Is there a program that can make extra background so my square image fits wordpress banners better?
Yes, the answer to these is 'outpainting'.
Artificial Intelligence
It is possible to use Artificial Intelligence (AI) to add information to a picture that doesn't exist in the original. So a square image can have it's left and right borders extended with a relevant background. A seamless extension of the image that the original author never imagined. It sounds very science fiction but is ever so easy to use.
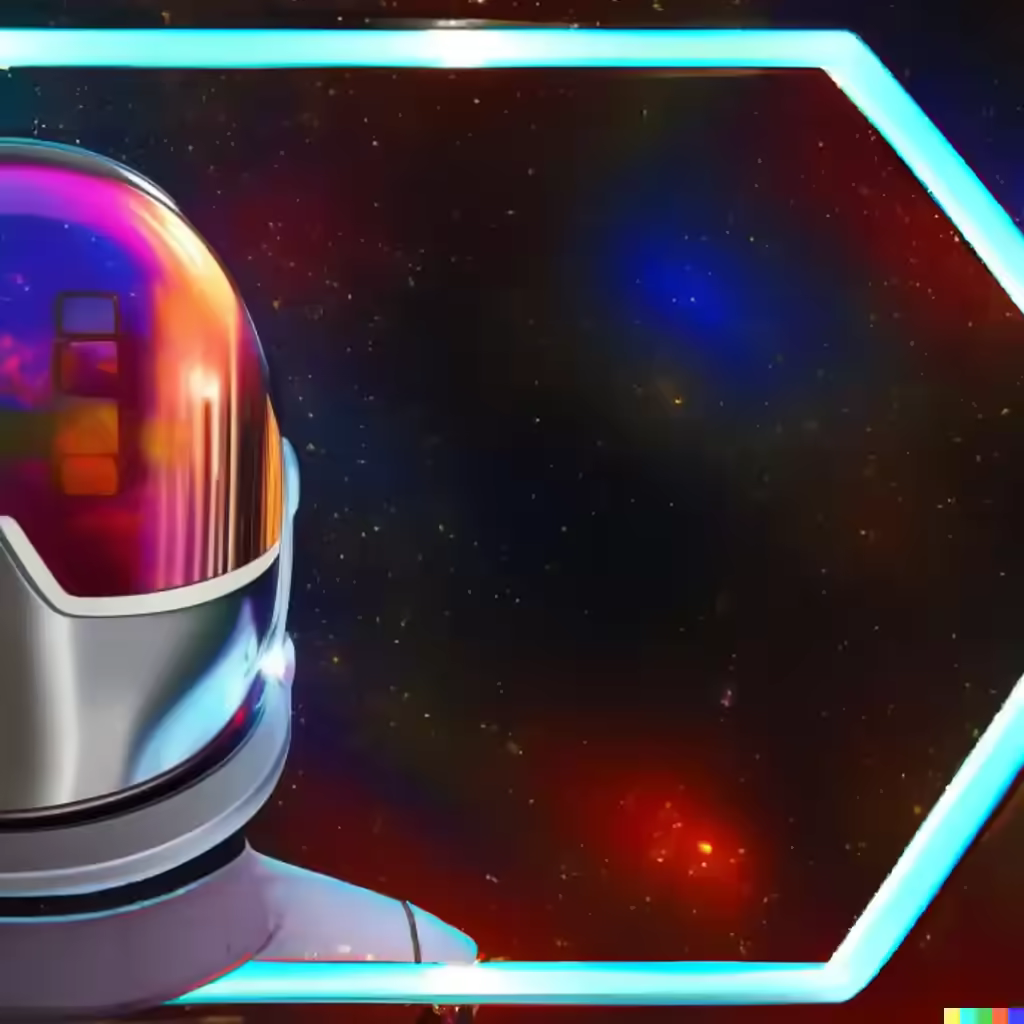
Example of outpainting
We use this image of this astronaut on our Awesome Free Images post. But we also wanted to use the spaceman as the wordpress banner. To achieve this the square image of 512 x 512 px needed a boost in resolution and more importantly it need to be wider not taller.
This is our astronaut:

He is a great piece of free AI generated artwork but is very tightly cropped and could do with some more image to the left and right that would create a rectangle of at least 1200px wide without making the visor bigger.
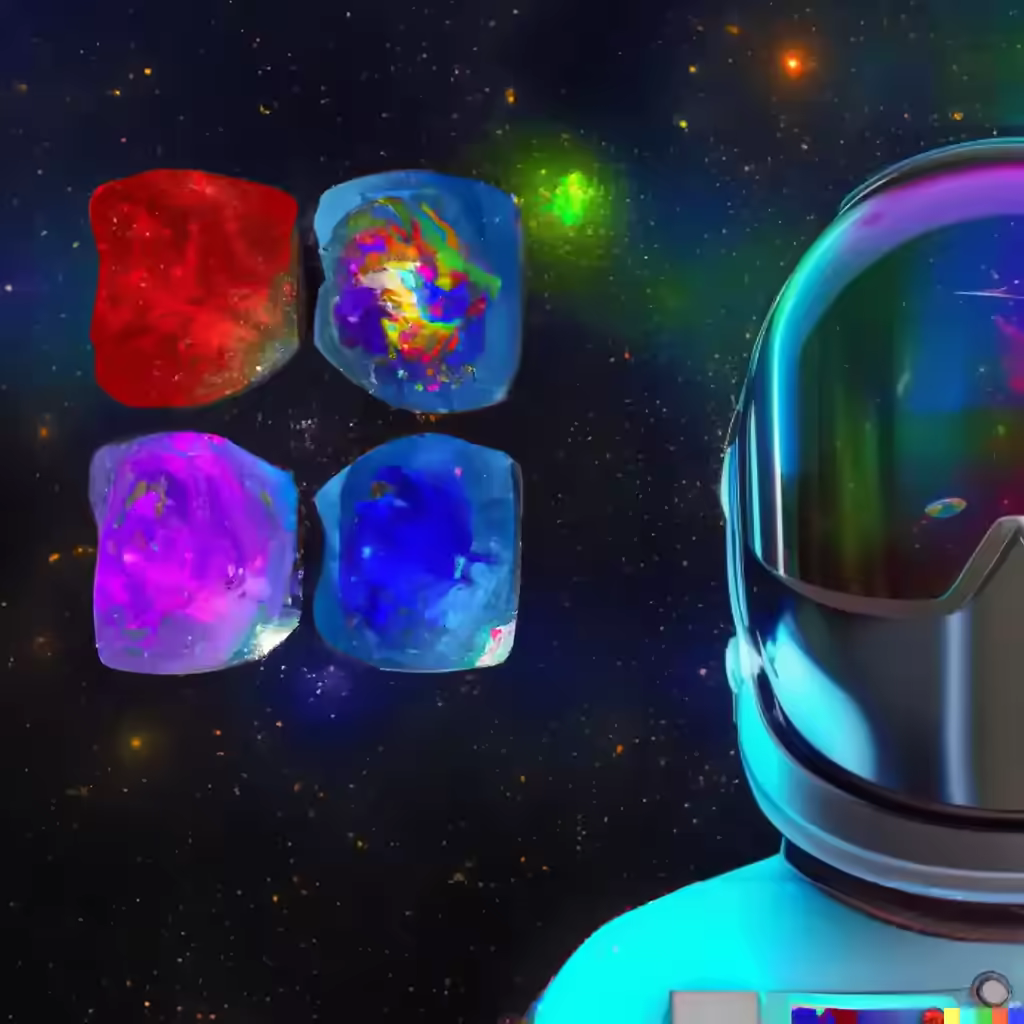
The solution is to get the AI art generator to add what it thinks would go well in this image. There are often 4 results and you can filp through each one until you see what you want. Not problem if none are any good, just try again but adjust the inpainting box.

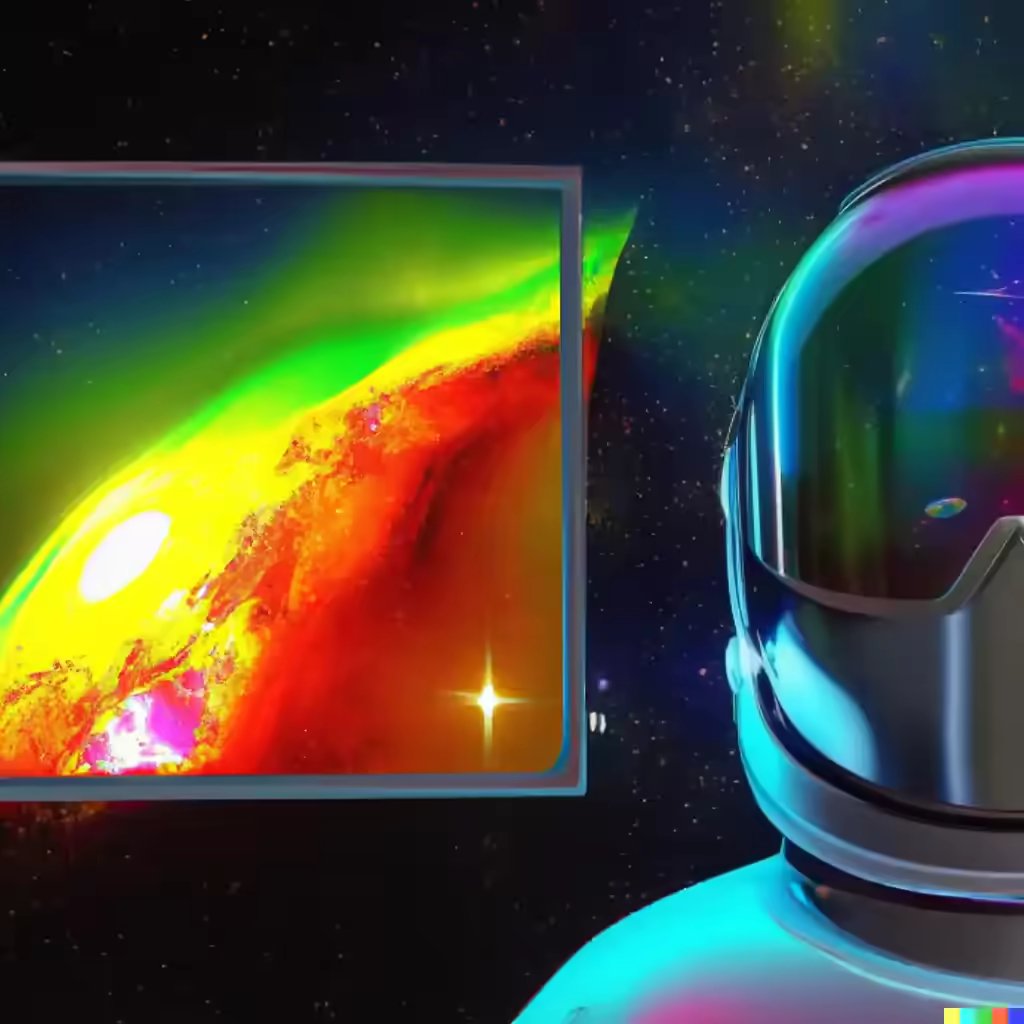
From our spaceman closeup selfie to an image wide enough to call it a banner.
Also notice the outpainting has included above and below, anything not required can just be cropped out with a graphics app.
Magic
We did not supply the background. It was all the work of DALL.E2. The AI looked at the existing background and suggested something similar that would blend in perfectly with the image supplied.
One button to download the image and it's yours to keep.
Use 'Add a Generation Frame - F' to place a blue rectangle overlapping the original image and some empty space on the page.
In the prompt just type 'inpaint' or 'outpaint' (they both seem to work) and click 'Generate'.
You get a black label with 4 white dots, use this to flick through the suggestions, accept the one you want.
If you get odd results not to your liking, cancel and re-adjust the Generation frame position. More or less overlap can help.
Modifying the outpainting command with supplemental commands can give some interesting results.
To complete more outpainting, just add another generation frame and repeat the outpainting procedure.
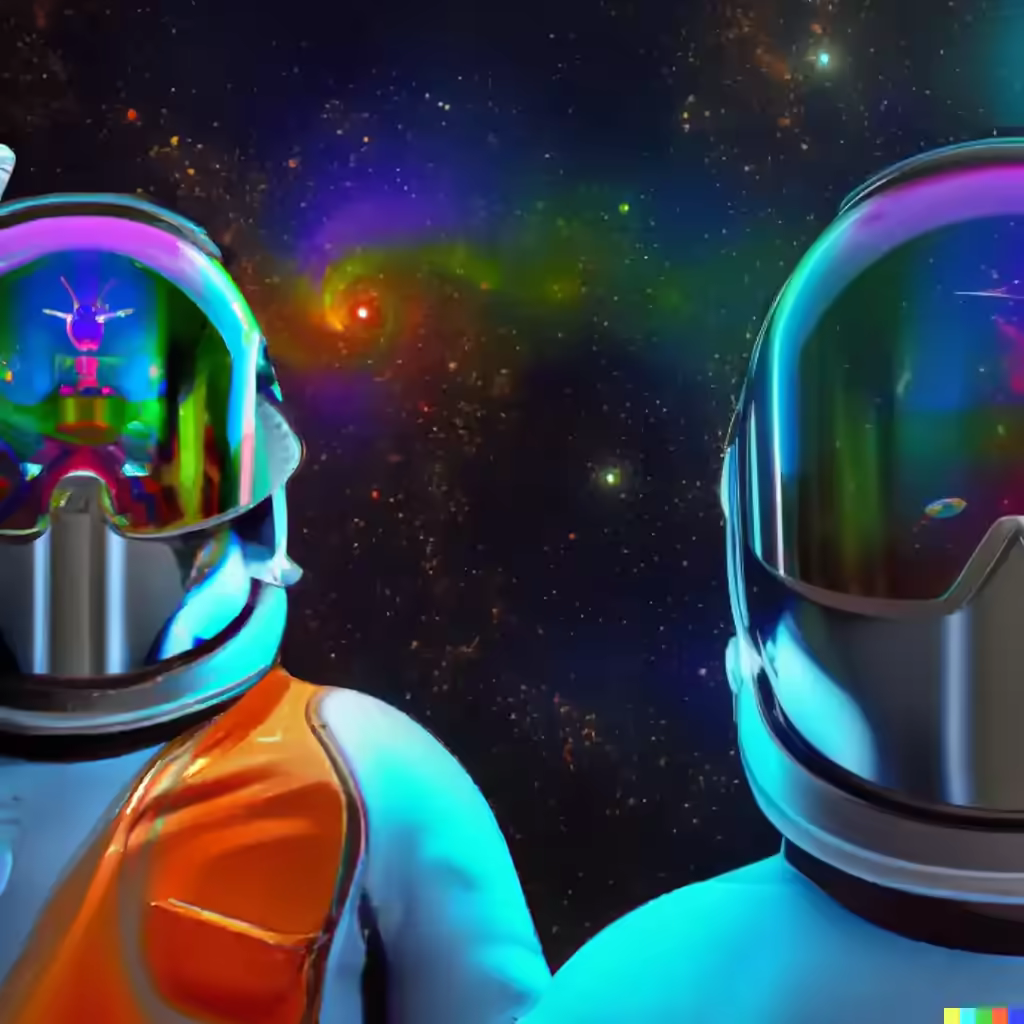
Ours
For out astronaut we added left then right outpainting that overlapped the visor which gave some unwanted results. A re-run with less visor and more black space produced the results we were seeking.

Timelapse
If you want to see a video of an outpainting in progress, see out the timelapse of Vermeers Girl with a Pearl Earring on the Dall.E site. It really helps explain in pictures what is going on in the AI program to make these backgrounds appear from nowhere.
Rejects
These are some of the AI results we rejected. Not because they were bad, they just didn't fit with the idea at the time. A better control of the AI commands can produce more controlled results but this is art. Art at it's digital finest, let the AI run free.

The wordpress quote block doesn't stand out enough from the main text. Quoted text and the main article text look too similar. There is not enough demarcation between the two. Can AI help solve the problem?
CSS
The fix is going to be some magic CSS. But just what do I need to change? There are options of inspecting the css with the browser tools (CTRL+SHIFT+I) and then tweak away, save the changes and add them to wordpress.
But it is the dawn of useful ChatAI bots that can write code for you.... Lets see if ChatGPT can come up with a solution for me.
We asked ChatCPT to help out by giving the AI bot this task:
show me the css to make wordpress quotes more prominent
To make WordPress quotes more prominent, you can use CSS to style the blockquote element. Here's an example CSS code that you can add to your theme's style.css file or customize via a custom CSS plugin:
https://chat.openai.com/chat
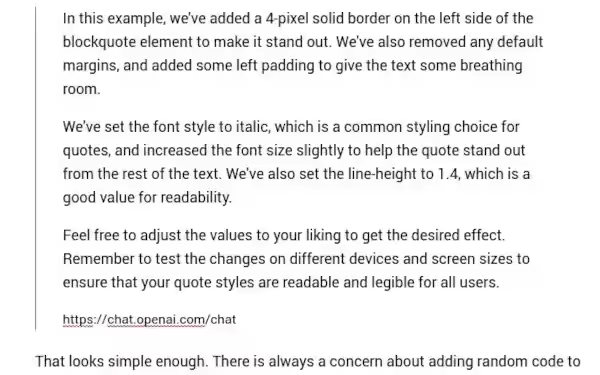
blockquote {
    border-left: 4px solid #333;
    margin: 0;
    padding-left: 20px;
    font-style: italic;
    font-size: 1.2rem;
    line-height: 1.4;
}
In this example, we've added a 4-pixel solid border on the left side of the blockquote element to make it stand out. We've also removed any default margins, and added some left padding to give the text some breathing room.
We've set the font style to italic, which is a common styling choice for quotes, and increased the font size slightly to help the quote stand out from the rest of the text. We've also set the line-height to 1.4, which is a good value for readability.
Feel free to adjust the values to your liking to get the desired effect. Remember to test the changes on different devices and screen sizes to ensure that your quote styles are readable and legible for all users.
https://chat.openai.com/chat
That looks simple enough. There is always a concern about adding random code to your hosting. A little bit of CSS can't be that malicious, but be careful of what you do add. Just because a ChatBot has suggested it, there is no guarantee it will work, won't break your site or is actually some malware.
Use some common sense, take backups and run a staging or development clone site if you want to test before pushing the changes to your live site.
A quick trip to 'Appearance' - 'Customise' - 'Additional CSS' presented me with a empty box to add my new ChatGPT generated Blockquote CSS into. Hit 'Publish' to save the changes and fingers crossed it worked.
Before and After
Before
Vanilla WordPress BlockQuote
After
ChatGPT improved WordPress BlockQuote
ChatCPT did what it said it was doing and improved the blockquote in wordpress. Having the CSS there means further adjustments can be made easily. Further testing on different devices will follow to ensure everything is still working.
WordPress SEO checking tools can show 'Duplicate H1 tags'. Further investigation shows that the same H1 tag is used for page1/page2/page3 etc.
Duplicate H1
H1 is usually the site title and show the search engine what the most important part of the page is. This should be the top, the first paragraph of information should be the most relevant to the page title (H1) for maximum SEO effect.
Pagination
Pagination is the splitting up of many topics into manageable pages. WordPress can paginate the categories and tags. This pagination can make the page load more quickly because only a few previews of the tag or category are loaded for each page. But the problem is the same H1 tag is reused for every page.
Multiple H1
Having the same H1 on different pages gives the error of Duplicate H1 tags. The different pages are just the same category or tag list broken into pages, but it is still flagged as an SEO error. Thankfully its not a difficult fix if your theme supports it.
Fix for Duplicate H1
The fix for duplicate H1 on wordpress for category and tag pages can be achieved by adding a page number to the H1 description.
If you are using a TagDiv theme, like Newspaper you can find the setting in its template editor.
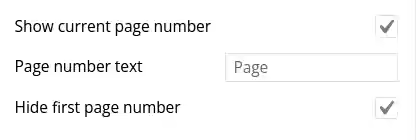
Three key settings will fix the duplicate H1 due to pagination in categories and they are:
- Show current page number
- Page number text
- Hide first page number
Show current page number (☑) will append the current page number to the H1 tag text. This makes each page to have a unique H1 text.
Page number text is for you to change if you don't want to add the word 'Page' to the H1. You may have already use the word 'page' and something different can fit better. You can just leave it as default.
Hide first page number is pretty neat. The fist page H1 won't be altered. Only page 2, 3 etc will show page number. This will leave your H1 exactly as you wanted it to be for the first page. Subsequent pages of the same category and tag will have page numbers appended.
You get unique H1 categories and tags in a few clicks. Job done.
Final
After saving the changes your category and tag titles will now look like:
- SEO Description H1
- SEO Description H1 - Page 1
- SEO Description H1 - Page 2
- SEO Description H1 - Page 3
- .....
You get a unique H1 tag for every category and tag page when they have been broken up into multiple pages for easier reading and quicker page loading.
Getting indexed by Google
Search Engines February 26, 2023 0
You have a website and you want it to appear on the google search engine.
This is a very common request and some are more successful than others in getting their website added to the big G.
Great Content
You have great content, but there is more to engaging with google than just your unique and informative content. Adding these necessary features are quite simple but can easily be overlooked when building a new site.
Add these
There are a few things to add to a new website to improve the chances that google will want to index your site.
About Us Page
Make a new page to act as your 'About Us' information post. Add a little bit or a lot of information to your new about us page that google can see and learn about you.
Contact Us Page
Adding a 'Contact Us' page will send the right signals to Google that you are a professional outfit that can be contacted. A contact form is a popular choice and can filters spam contact with a plugin like Akismet for wprdpress.
Privacy Policy
Adding a Privacy Police my be a legal requirement for the country you are hosting in, living in or the country you expect your visitors to come from.
- GDPR (European Union)
- UK-GDPR, PECR, Data Protection Act (United Kingdom)
- General Privacy Guidelines (United States)
- PIPEDA (Canada)
- Privacy Act 1988 (Australia)
- POPIA (South Africa)
- LGPD (Brazil)
Different regions have their own take on the privacy/cookie laws.
There a number of wordpress plugins that can handle the bulk of the privacy for you, we like Complianz for wordpress sites.
If you want to serve ads on your website to generate an income then we recommend the privacy policy service from Ezoic. While the ezoic service is centred around monetising your website with Advertising, it does include some awesome free addons like their Privacy Policy solution. Their privacy works with all websites and no plugins are required.
Add a Menu
Adding a menu will make it easy for your visitors, including the google bot to navigate your site. Without a menu the search engine crawler will struggle to see all your sites pages and may consider the site to be of low quality content.
More than content
Getting on the right side of the search engines needs more than just great content. It needs to be accessible to all, easy to navigate and the site should provide an enjoyable experience. Adding the extra pages for about, contact and privacy will all send good signals to the visiting crawlers to encourage their return.